The Art of Puss in Boots: The Last Wish - Style Breakdown
Part of Character Design Gallery: Design Studies and Breakdowns
See the original work
ArtStation
ArtStation portfolio
by Neil Ross
Artist and concept designer in the feature film industry; his portfolio includes concept art he has posted for Puss in Boots: The Last Wish.
See ArtStation portfolio on ArtStation (opens in a new tab) ↗Titan Books
Official art book for the 2011 first film
by The Art of Puss in Boots (Ramin Zahed)
Art book for the first Puss in Boots film (2011), useful for seeing how the character's world looked before the sequel's painterly redesign.
See Official art book for the 2011 first film on Titan Books (opens in a new tab) ↗Puss in Boots: The Last Wish concept art and the finished film look very different from earlier films in the Shrek series. According to Wikipedia’s summary of the production, DreamWorks Animation’s team, inspired by Sony’s Spider-Man: Into the Spider-Verse, aimed for a painterly look that resembles storybook illustration, an idea suggested by production designer Nate Wragg. This page breaks down that style in words and demonstrates the techniques with our own generic diagrams. We don’t reproduce frames, concept art or the character himself. To see the real Puss in Boots concept art, follow the official links above.
What defines the style
In our reading, three ideas give the film its look:
- Painterly, illustrative frames. Surfaces carry visible brush texture, and shapes are simplified, the way a storybook painter would simplify them, rather than rendered with smooth, photoreal detail.
- Graphic, drawn accents. Lines, effects and small details feel hand-drawn on top of the 3D, which pushes the image toward illustration.
- Stylized timing. Stylized animated films often vary their timing, holding some poses for more than one frame so fast action feels snappier and more graphic than smooth CG (see the timing demo below).
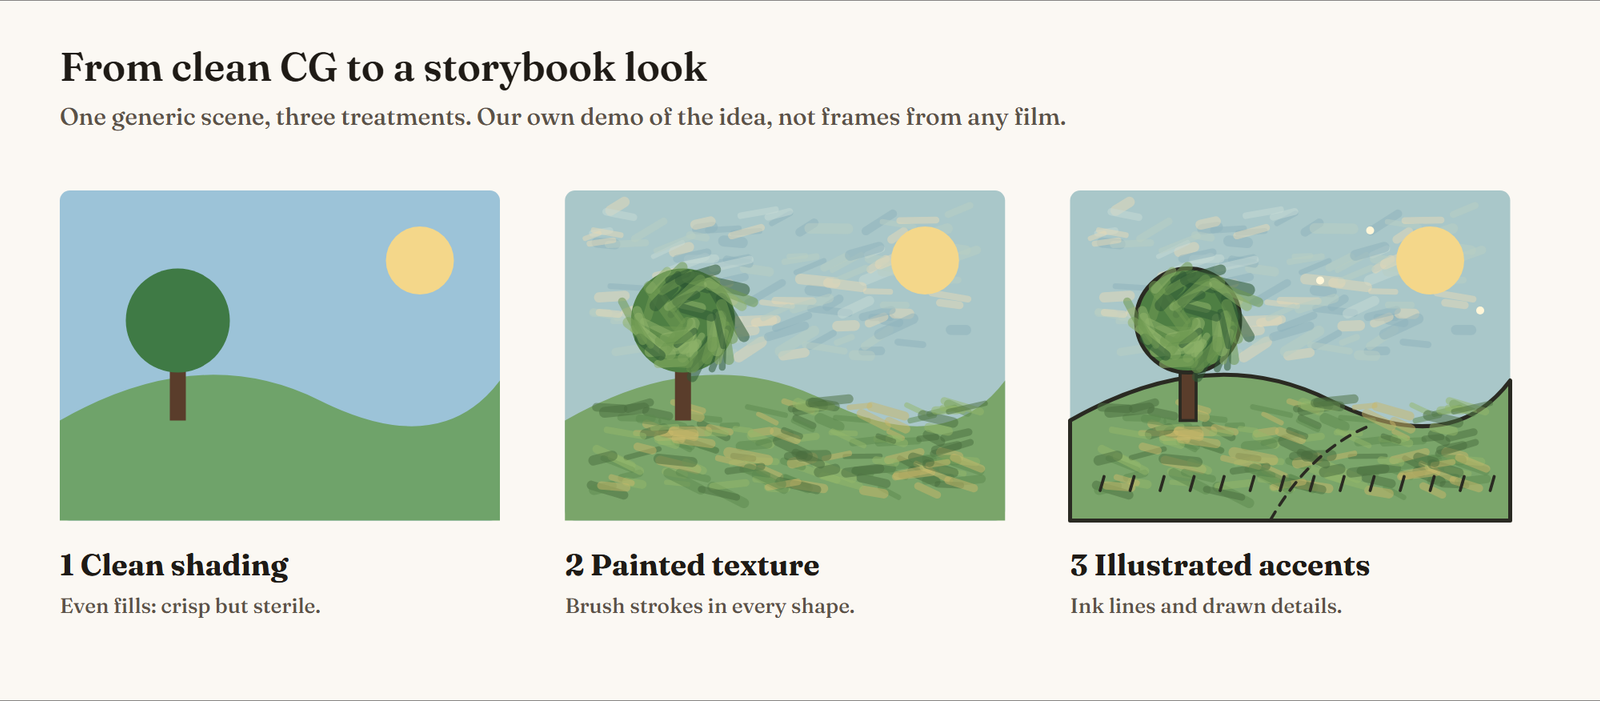
The demo at the top of this page shows the first two ideas on a simple scene: clean shading, then painted texture, then illustrated accents.
Painterly storybook frames
A storybook look starts with simplification. Instead of rendering every leaf, a painter groups them into one shape and lets brush strokes suggest the detail. The same scene can feel sterile with clean fills and alive with texture.
To practice the look, pick a simple scene (a tree, a hill, a path) and paint it three times: flat shapes only, then with textured brush strokes that follow each form, then with a few ink lines and drawn details on top. Stop before it gets busy: storybook images work because they leave room for the eye.
Stepped animation in action scenes
Animators describe timing by how often a new drawing appears. On ones, every frame gets a new pose; on twos, each pose is held for two frames; on threes, for three. Fewer, stronger poses make motion feel snappier and more graphic, which is one reason stylized animation can feel so different from smooth CG.
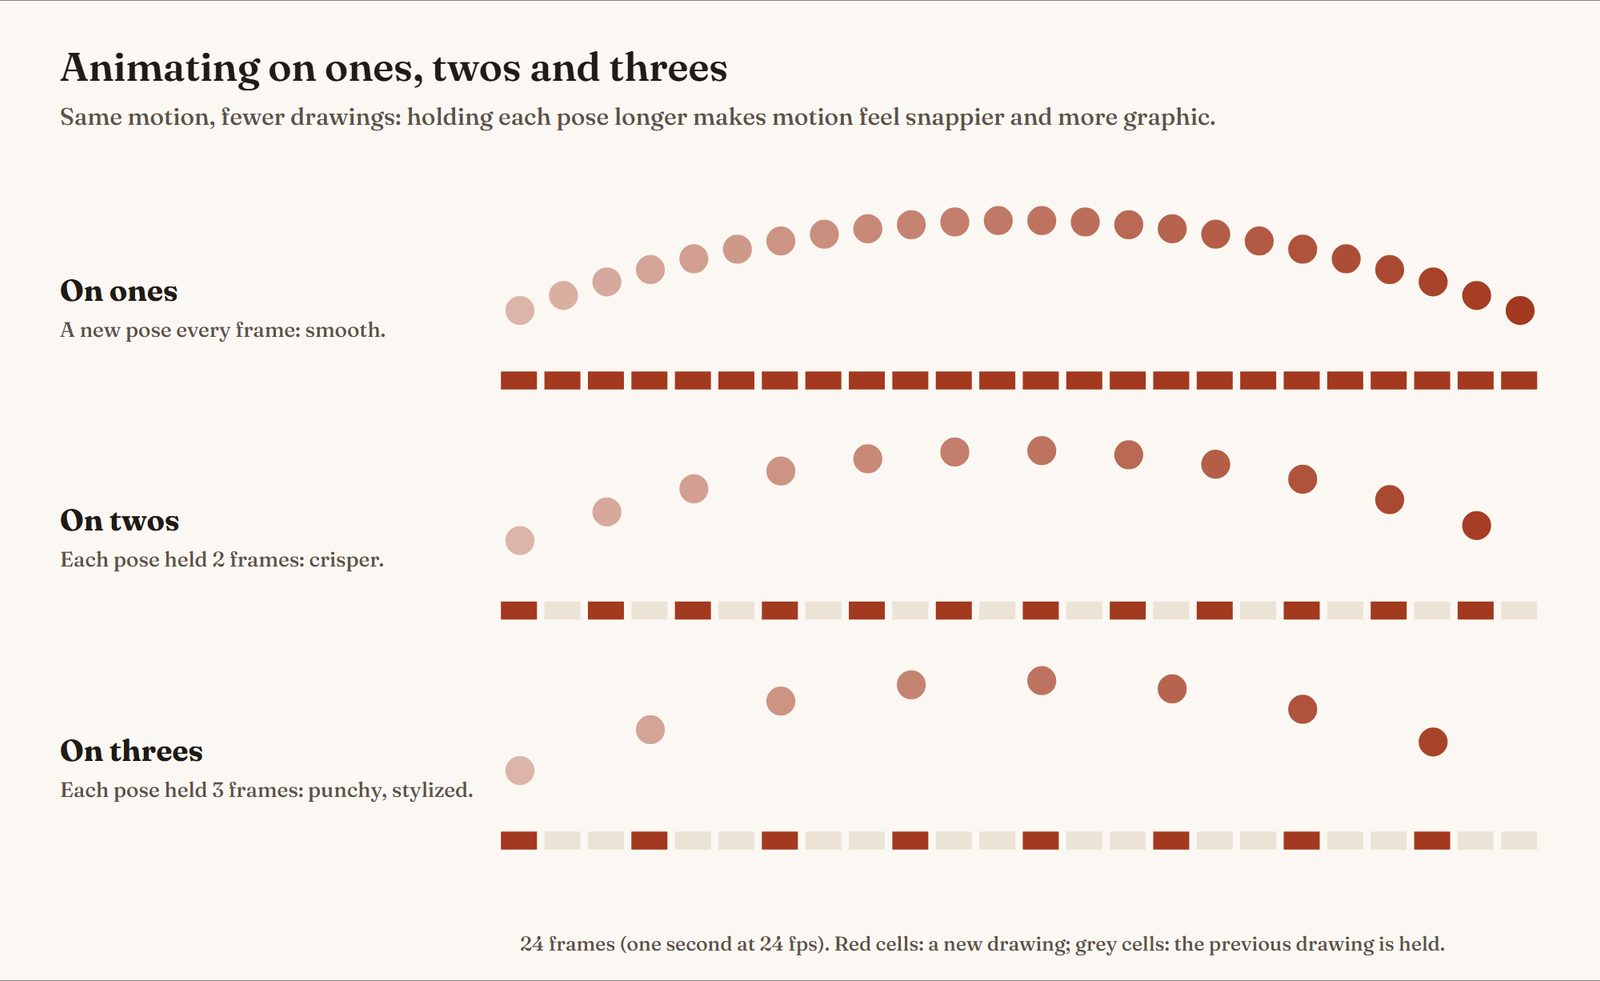
You can feel the difference yourself: animate a bouncing ball on ones, then delete every other drawing and hold the rest for two frames. The second version has more punch, especially on fast actions.
Color and light in a storybook world
A painterly style lives or dies on color and value. In storybook illustration, color is usually simplified into a few families per scene, with a clear light source and a deliberate mood: warm and inviting, cold and threatening, or golden and nostalgic. The film’s fairy-tale goal is a good reminder that color design should serve the story, not just look pretty.
If you’re studying the look, try these exercises:
- Three values per scene. Paint a scene using only a light, a middle and a dark value before adding color.
- One warm, one cool. Pick a warm light and a cool shadow color and keep every object inside that relationship.
- Mood swaps. Paint the same scene as a cozy tavern and as a dark forest, changing only color and light.
Designing appealing animal heroes
Animal characters in animation usually exaggerate a few features the audience reads instantly: big eyes for emotion, expressive ears and tails for body language, and a clear costume element or prop for personality. The best designs keep the animal’s anatomy believable underneath the exaggeration, so poses still feel natural. Study real animals for posture and movement, then simplify.
Where to see official Puss in Boots concept art
For real production art, start with official and credited sources. The artists’ own portfolios, such as Neil Ross’s ArtStation page linked above, show work they’ve chosen to share. The art book for the first film shows how the character’s world looked in 2011, which makes a useful contrast with the sequel’s storybook redesign.
Looking for how to draw Puss in Boots?
Many people search for how to draw Puss in Boots. We don’t publish step-by-step tutorials for drawing copyrighted characters. Instead, here’s how to learn the principles behind appealing animal characters, so you can design your own.
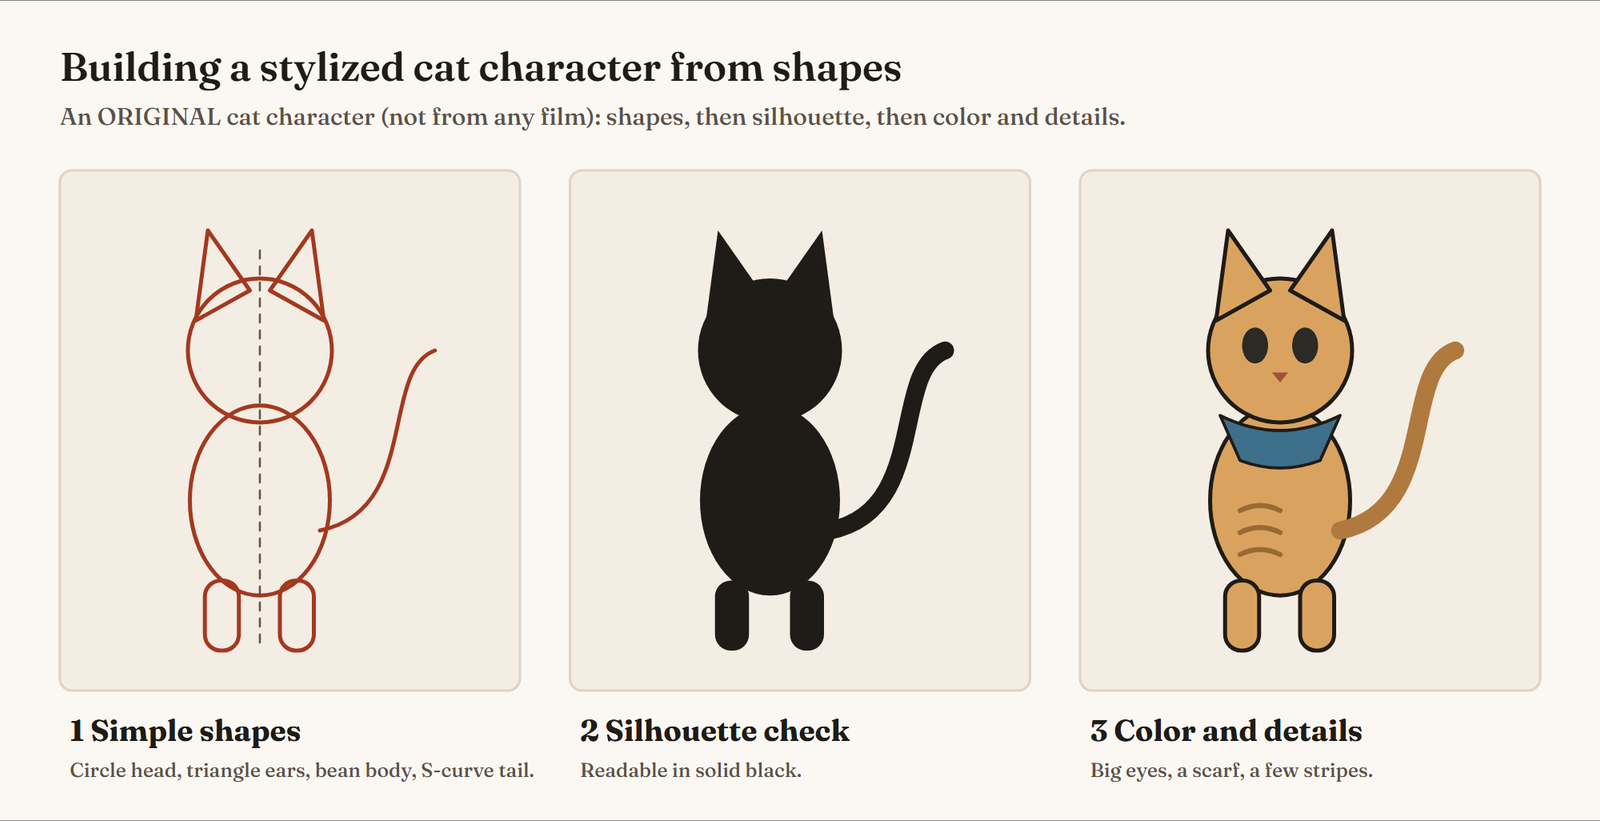
- Start with simple shapes. A circle for the head, triangles for the ears, a bean for the body and an S-curve for the tail.
- Check the silhouette. Fill it in black. If the character still reads, the shapes are working.
- Add personality with a few details. Big eyes, one costume element, a simple pattern. Resist adding everything at once.
- Pose with a line of action. Even a cat character needs a clear, curved line through the body to feel alive.
Our guide to character design basics explains shape language, silhouettes and costume in depth, and it’s the best next step if you want to draw characters with this kind of appeal.
Puss in Boots art and fan art
Drawing a character you love is a classic way to practice, and plenty of Puss in Boots drawings and artwork are fan art. If you make fan art, credit the film and label it clearly. For your portfolio and for learning, original characters show far more about your own skills. Use the film as a style reference, not as a source to copy.
What artists can learn from The Last Wish concept art
Studying the film’s look is most useful when you focus on decisions you can reuse:
- Simplify, then texture. Group detail into big shapes before adding painterly texture.
- Let the 2D show. Drawn lines and effects on top of a render make it feel illustrated.
- Time for impact. Fewer, stronger poses make action feel bold.
- Match style to story. The team’s goal, according to Wikipedia’s summary, was a fairy-tale look; pick a style that serves your own story.
For more breakdowns like this one, see our design gallery and our breakdown of the art of Arcane.
Design your own
- Design an original animal hero for a fairy tale. Build it from three simple shapes.
- Repaint one of your own drawings as a storybook illustration: brush texture plus ink accents.
- Animate a bouncing ball on ones, then on twos. Compare how each feels.
- Design a fairy-tale villain as the opposite shape of your hero.
- Paint a forest scene where every shape has visible brush strokes.
- Design an animal character for a western-style story without copying an existing one.
- Draw your character in silhouette in five poses. Can you read every one?
- Design a small cast of fairy-tale animals with a shared palette and different silhouettes.
- Paint the same scene twice: once clean and once painterly, then decide which suits your story.
- Design a character whose costume tells you which story genre they come from.