How to Learn Figure Drawing: A Step-by-Step Guide for Beginners
Quick answer
Learn figure drawing in five layers: gesture (the line of action), proportions, a simple mannequin, the anatomy that shows on the surface, and finally poses from life, photos or 3D models. Practice in timed sessions, starting with 30-second poses and building to one long pose, and compare every drawing with the reference.
Figure drawing is drawing the whole human body so it stands, balances and moves. It looks hard because the body has so many parts, but you don’t learn them all at once. You learn the figure in layers, in a fixed order: the gesture, then proportions, then simple forms, then the anatomy that shows, and only then the details. This guide walks through that order step by step, gives you timed practice routines, and includes eight new pose references, each shown with and without its line of action.
Every pose figure on this page was made for it: 3D renders of generic MakeHuman figures in a plain gray bodysuit, with our own line-of-action overlays, plus diagrams we drew in code.
What figure drawing is
Figure drawing is the practice of drawing the human figure, usually as a full body, from a live model, a photo or a 3D figure. It sits between quick sketching and finished illustration: the aim is a believable body, with weight, proportion and movement, rather than a likeness of a particular person or a polished picture.
People use several names for nearly the same thing. Life drawing usually means drawing from a live model in a class or session. Gesture drawing means very fast drawings, often 30 seconds to 2 minutes, that capture the action of a pose. A figure study is a drawing made to learn something specific, such as how the torso twists. And plain body drawing or full body drawing are the everyday terms for the same skill.
Artists have drawn the human figure for as long as there has been art, and figure drawing is still a core part of training for illustrators, animators and concept artists. The reason is practical: if you can draw a convincing figure from imagination, you can draw characters doing anything a story needs.
What you need to start
Very little. Figure drawing is about seeing and construction, not materials, so start with whatever you already have:
- Something to draw with: a soft pencil (our guide to the best pencils for drawing explains the grades), a ballpoint pen or a marker. Pens are good for gesture because you can’t erase, which pushes you to commit to the line.
- Cheap paper: printer paper or a large, inexpensive sketchbook. You will fill a lot of pages, and you should feel free to waste them.
- A timer: a phone timer is enough. Timed poses are the backbone of practice.
- Reference: the poses on this page, a pose tool, photos, or a live session.
Draw large, from the shoulder and elbow rather than the wrist, especially for gesture. Small, tight drawings tend to become stiff.
How to learn figure drawing: a step-by-step path
The order matters more than the materials. Each step below gives you something the next one needs. If a drawing goes wrong, the problem is usually in an earlier layer, so go back a step instead of adding detail.
Step 1: Gesture and the line of action
Gesture comes first because it carries the pose. The line of action is one long curve through the whole figure, usually from the head down the spine and into the leg that holds the weight. Draw it in a few seconds, then hang the head, the shoulder line, the hip line and the limbs on it.
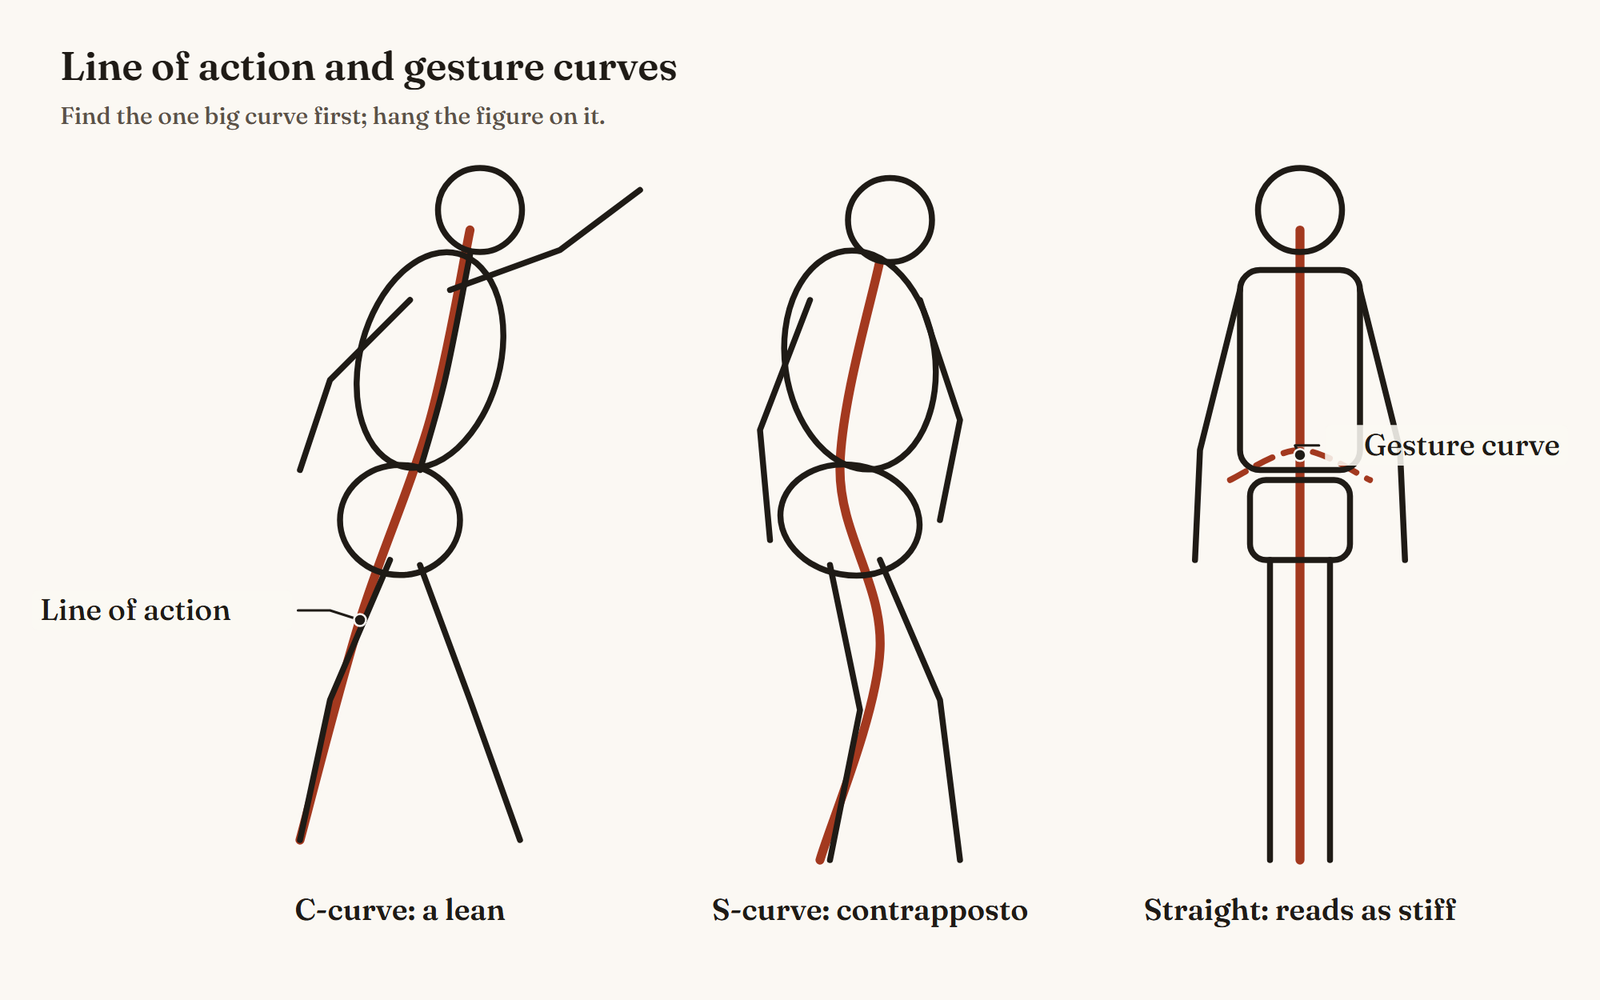
Curves read as movement and straight lines read as stiffness or bracing. Beginners usually draw figures too straight, so exaggerate the curve slightly. Our planned guides to gesture drawing and the line of action go deeper, and timed practice tools are compared in our guide to the best gesture drawing sites.
Step 2: Proportions
Proportions are measured in head heights. Many drawing books teach an idealized adult that is eight heads tall: chin at one head, crotch at four, knees near six. That canon is a construction grid, not a measurement of real people. When we measured our own 3D figures for the anatomy guide, they came out at about 7.6 and 7.8 heads tall.
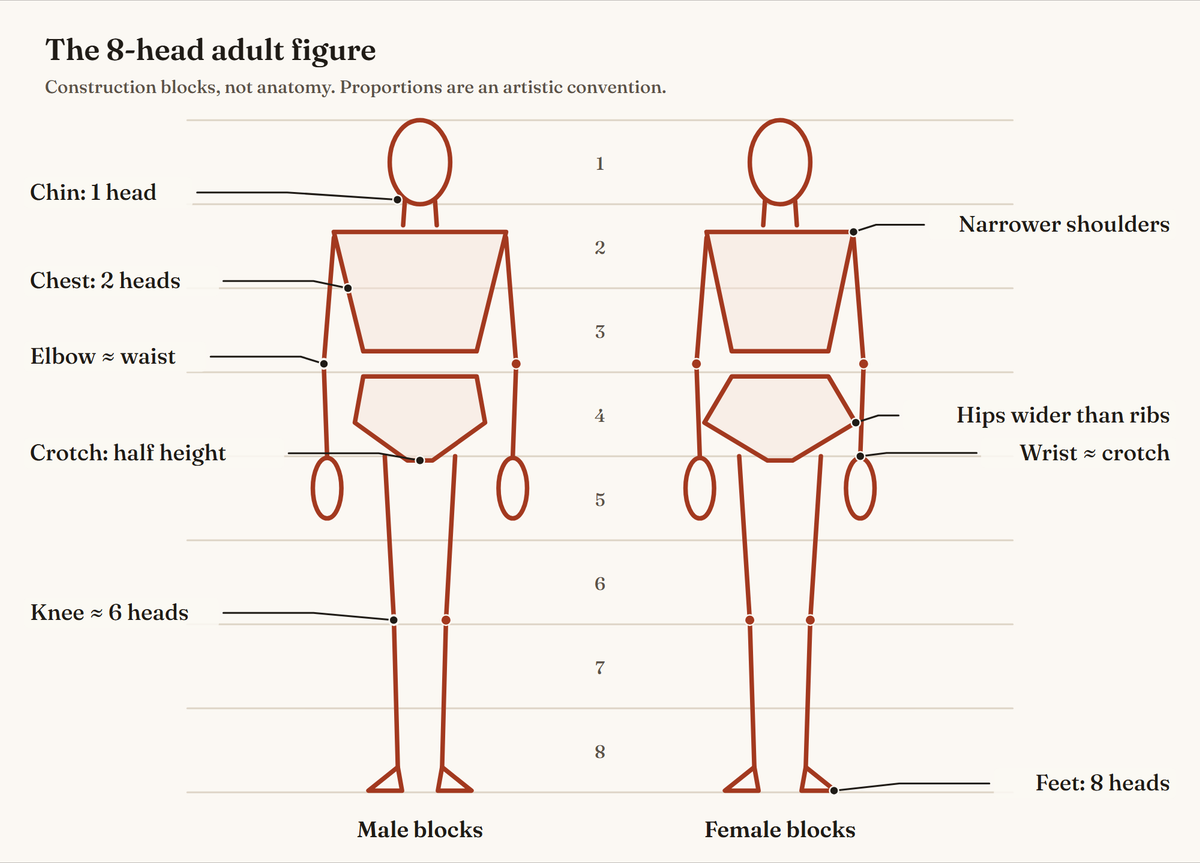
Use the grid to construct figures from imagination, and measure your reference when you draw from a model or photo: hold your pencil at arm’s length, mark the head height with your thumb, and count how many fit from head to feet. Our planned guide to body proportions for drawing covers more landmarks.
Step 3: The mannequin: simple forms
Next, turn the gesture into a simple 3D mannequin. Three masses carry the body: the head (an egg), the rib cage (a larger egg) and the pelvis (a box). The limbs are tapered cylinders and the joints are circles. This is the stage where a figure starts to look solid and turn in space.
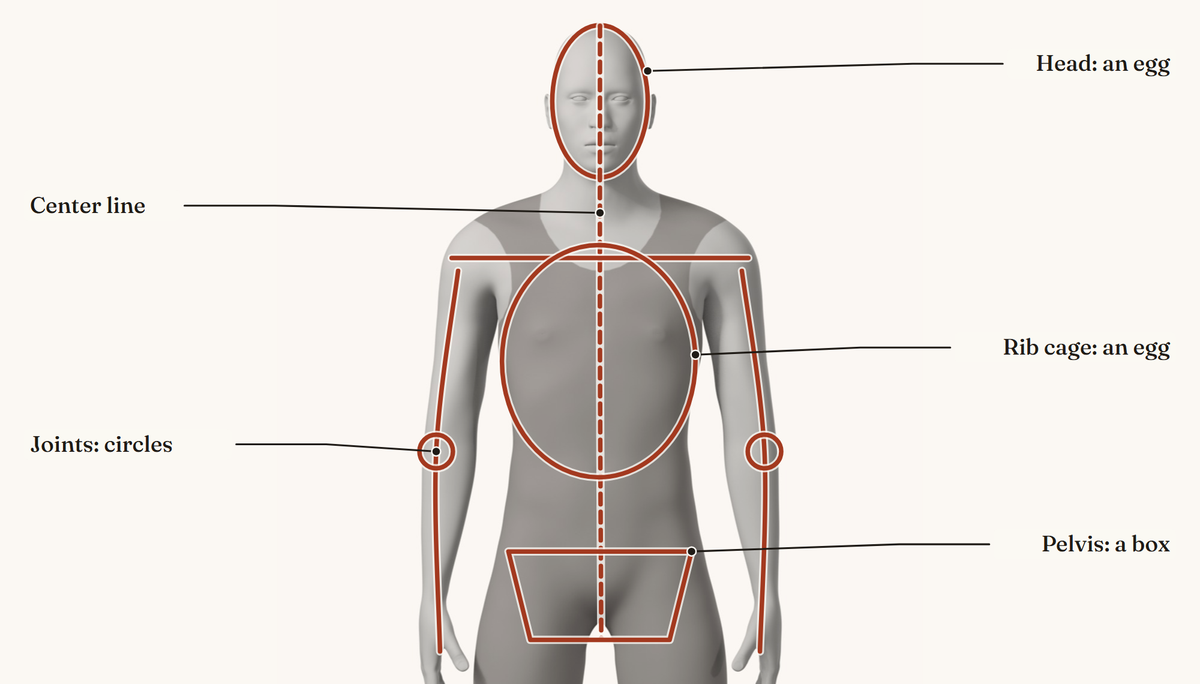
Practice the mannequin until you can draw it from any angle without reference. It is the base every later layer sits on. The mannequin and bean method is planned as its own guide.
Step 4: Anatomy where it shows
Anatomy turns a mannequin into a body. You don’t need every muscle: learn the bony landmarks that show at the surface (collarbones, elbows, the front of the hip bone, kneecaps) and the large muscle groups of the torso, arms and legs. Our anatomy drawing guide covers this layer in detail, with labeled plates and 3D references.
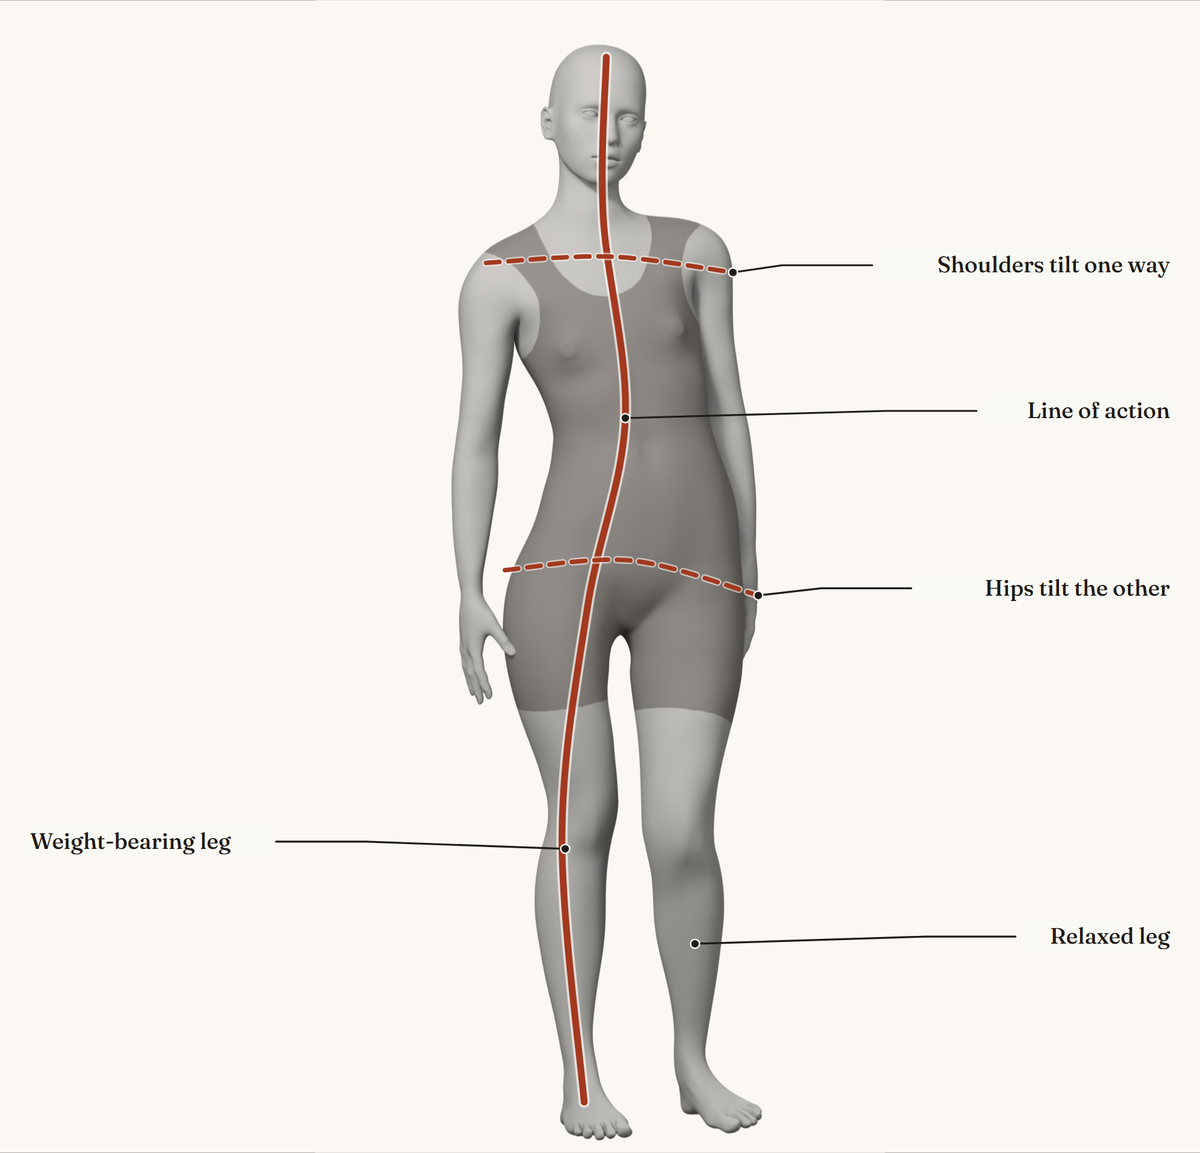
One idea from anatomy matters for every pose: weight shift. When a figure stands on one leg, the hip on that side rises, the shoulders tilt the other way, and the head stays over the supporting foot. Sculptors call it contrapposto.
If you want a book for this stage, George Bridgman’s Constructive Anatomy is in the public domain and free to read on the Internet Archive. It is built around the same idea of simple masses joined together. For modern books sorted by level, from gesture to anatomy, see our roundup of the best figure drawing books.
Step 5: Poses from life, photos and 3D
With the four layers in place, draw real poses: walking, sitting, reaching, twisting. Every new pose uses the same order: line of action, proportions, mannequin, anatomy. The poses further down this page are a starting set, and the section on drawing from life, photos and 3D models explains how to use each kind of reference.
Foreshortening, where a limb points toward you, is the hardest part of this stage. Draw it as overlapping cylinders rather than an outline, and let the near form cut in front of the far one.
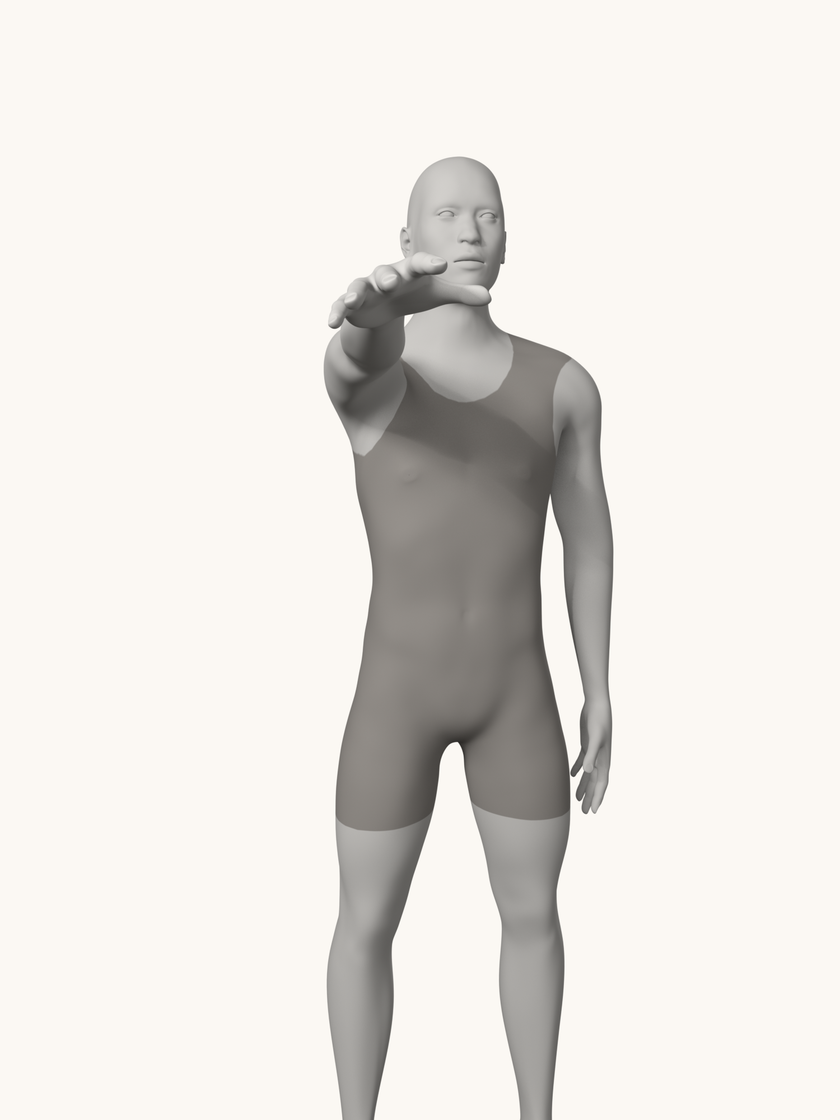
Our planned guide to foreshortening in figure drawing breaks this down further.
Figure drawing practice and timed routines
Figure drawing practice works best in timed sessions that move from short poses to long ones. Short poses force you to see the whole figure and stop you polishing details too early. Long poses are where you apply proportions and anatomy. A session that only has one or the other teaches half the skill.
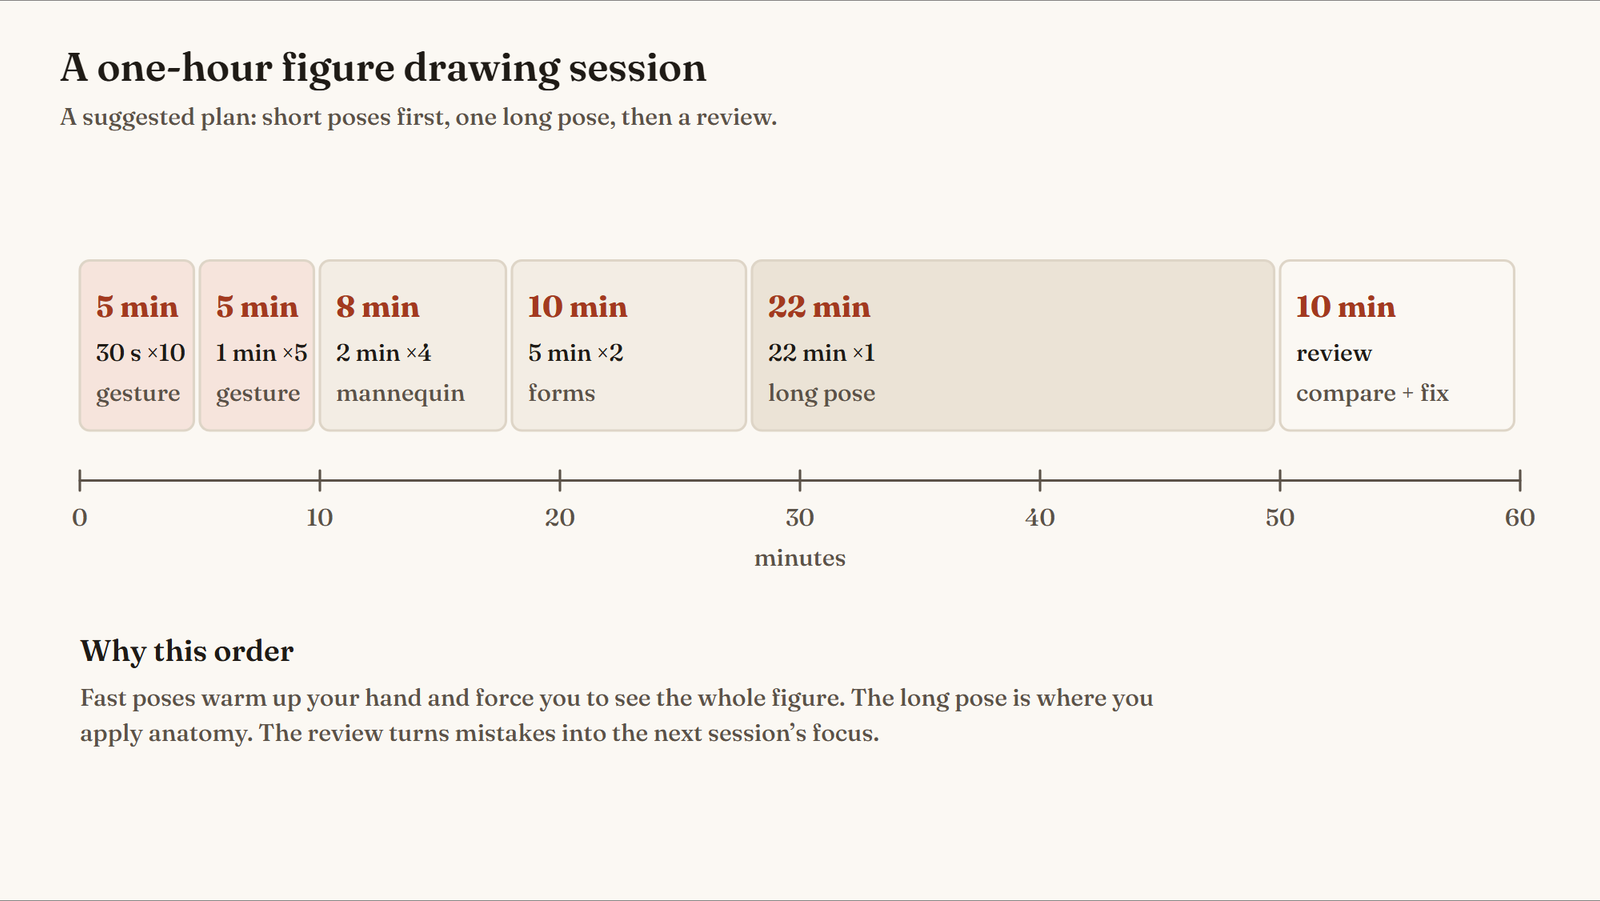
How to run a session like this:
- 30-second poses: the line of action only, ideally one or two strokes.
- 1–2 minute poses: add the head, rib cage and pelvis, then the limbs as curves.
- 5-minute poses: build simple forms and check balance over the feet.
- One long pose (10–25 minutes): apply proportions and the anatomy you are studying.
- Review: compare every drawing with the reference and write down the one thing to fix next time.
Figure studies are a different kind of practice: instead of drawing whole poses, you draw one problem many times, such as the twist of the torso or the way a knee bends. Mix them in when the same mistake keeps showing up in your timed drawings. Our planned guide to a timed figure drawing routine has longer programs, and the gesture sites guide lists the tools that run the timer for you.
A weekly practice plan
Short daily sessions beat one long weekend session, because the habit of seeing the whole figure builds through repetition. This is a suggested week for beginners, not a fixed program:
| Day | Focus | Session |
|---|---|---|
| 1 | Gesture | 30-second and 1-minute poses only |
| 2 | Proportions | Measure three poses in head heights |
| 3 | Mannequin | 2- and 5-minute poses as simple forms |
| 4 | Anatomy | One body part, from the anatomy guide |
| 5 | Full session | The one-hour plan above |
| 6 | From memory | Redraw three poses from the week without reference |
| 7 | Review | Lay out the week’s pages and pick next week’s focus |
Drawing from life vs photos vs 3D models
Each kind of reference teaches something different, so most artists use all three.
| Reference | Best for | Watch out for |
|---|---|---|
| Live model (life drawing) | Depth, form, real weight and timing | Classes cost money and time; poses can’t be paused |
| Photos | Any pose, any day; pausing on hard poses | Lens distortion and flattened depth; easy to copy lines |
| 3D models and pose tools | Any angle, adjustable lighting, clear forms | Poses can look stiff; no real weight or soft tissue |
Life drawing is the classic way to learn. A live model shows you depth and form that a photo flattens, and the time limit trains decisiveness. If you can join a class or a drop-in session, it is worth it. Our planned life drawing for beginners guide covers classes and etiquette.
How to do life drawing if you’re new to it: arrive early to set up, draw the whole figure in every pose before adding detail, and use the model’s breaks to step back and compare your drawings. Draw what you see rather than what you expect, and don’t photograph the model unless the session explicitly allows it. In longer poses, life drawing tips from the anatomy and proportion steps apply directly: measure in head heights, find the tilt of the shoulders and hips, and check where the weight falls. Many sessions also include portrait-length poses, which are a good time to practice life drawing of the head and face inside the whole figure rather than on its own.
Photos are the most practical daily reference. Use them for information, not tracing: build the figure from gesture and forms, then check it against the photo. Our planned guide to using photo reference without copying goes into this.
3D models let you rotate a pose and light it from any side, which makes them ideal for studying forms and foreshortening. The renders on this page are 3D figures; a comparison of free 3D pose tools is planned.
Female and male figure drawing poses
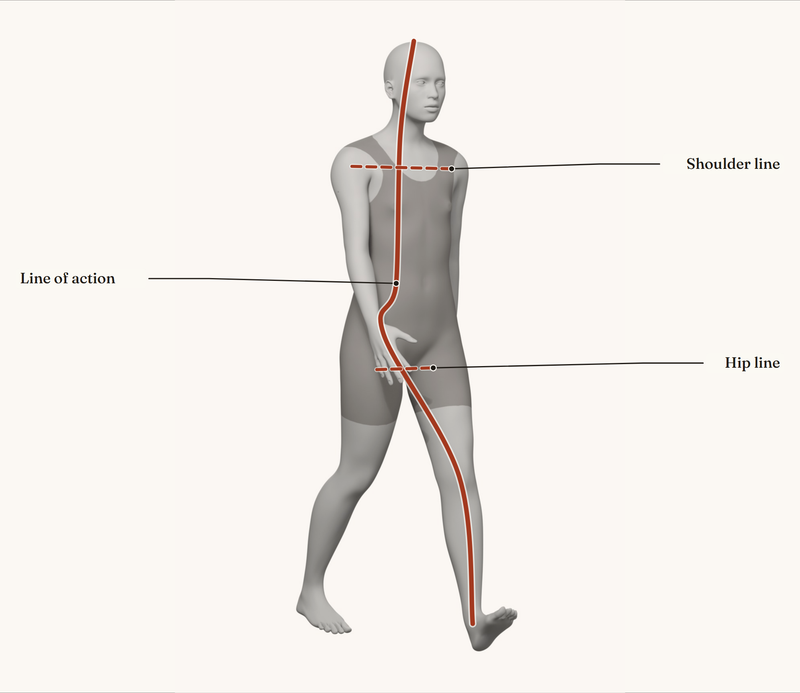
The same construction works for every body: line of action, proportions, mannequin, anatomy. What changes between figures is mostly proportion and the soft forms over the muscles, and it varies from person to person as much as between sexes. The eight poses below alternate between a female and a male 3D figure; each overlay shows the line of action and the curves that carry the pose.
Walking
Running
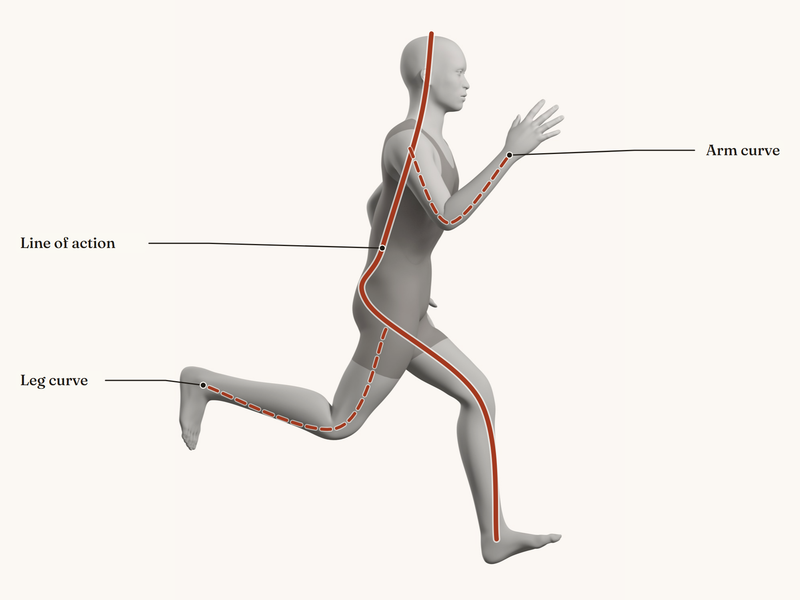
Walking and running. In a walk, the arm swings forward with the opposite leg, so the shoulder line and the hip line twist against each other. In a run, the line of action leans forward ahead of the feet, and the knees and elbows bend much more.
Crouching
Twisting
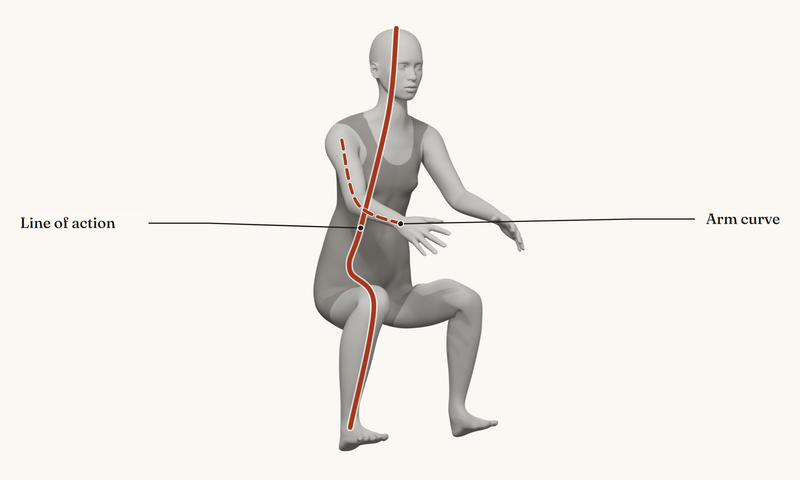
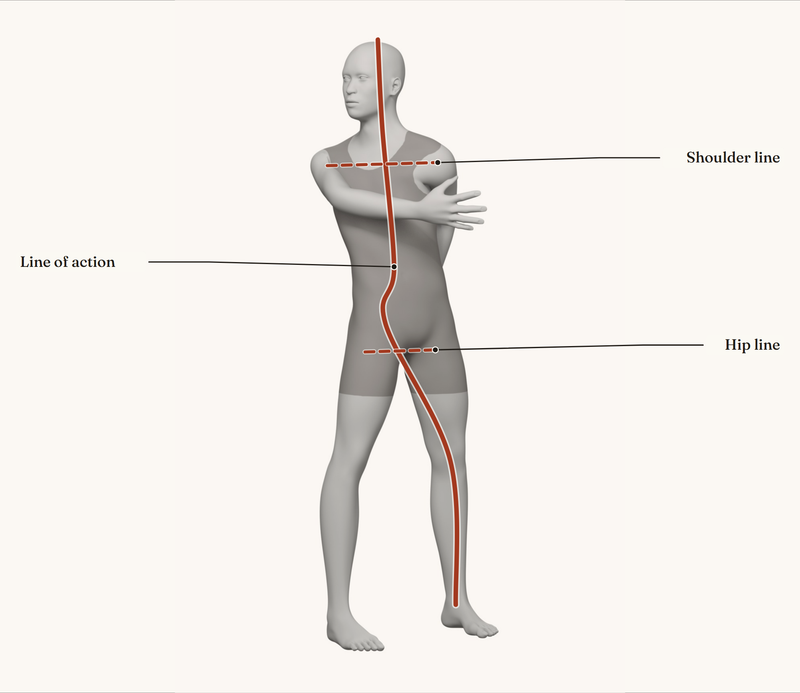
Crouching and twisting. A crouch compresses the figure: the line of action becomes a compact C-curve and the thighs come forward. A twist turns the rib cage against the pelvis, so draw the shoulder line and the hip line first and let the torso spiral between them.
Sitting on the floor
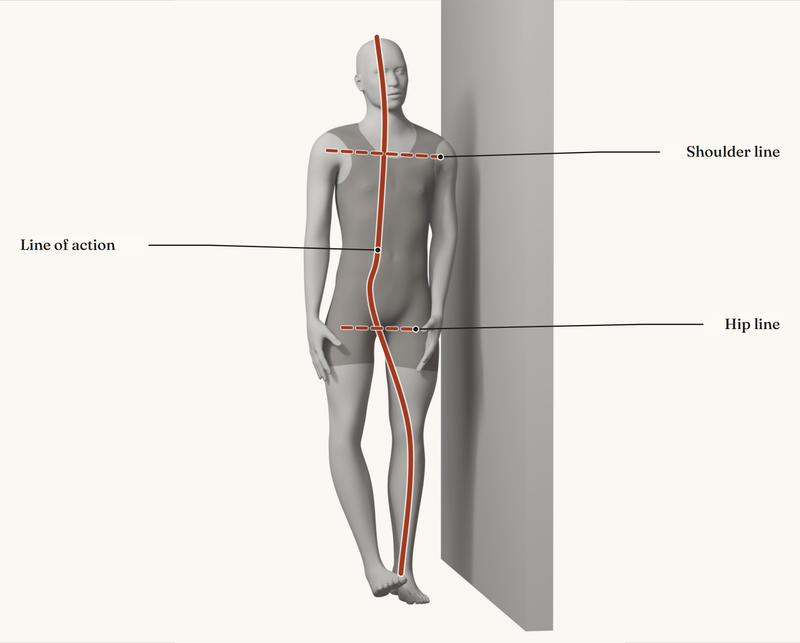
Leaning on a wall
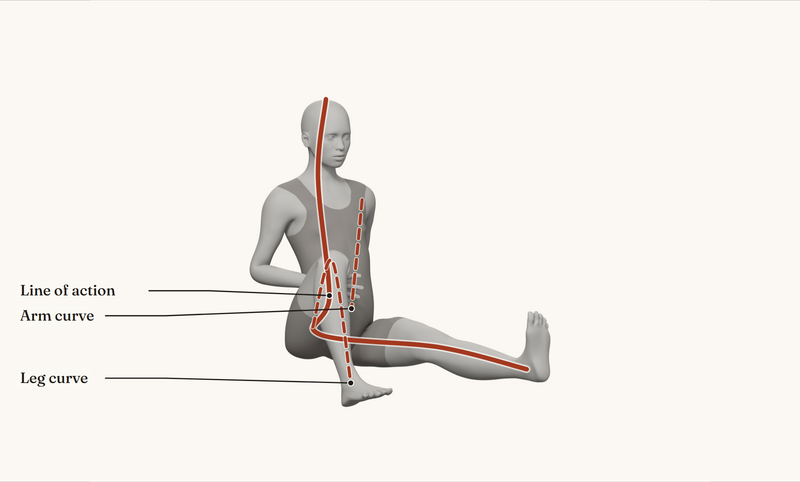
Sitting and leaning. When the body rests on the floor or a wall, mark the contact points first (the seat, the hands, the shoulder against the wall), then build the figure around them. A crossed leg or a bent knee keeps a resting pose from looking stiff.
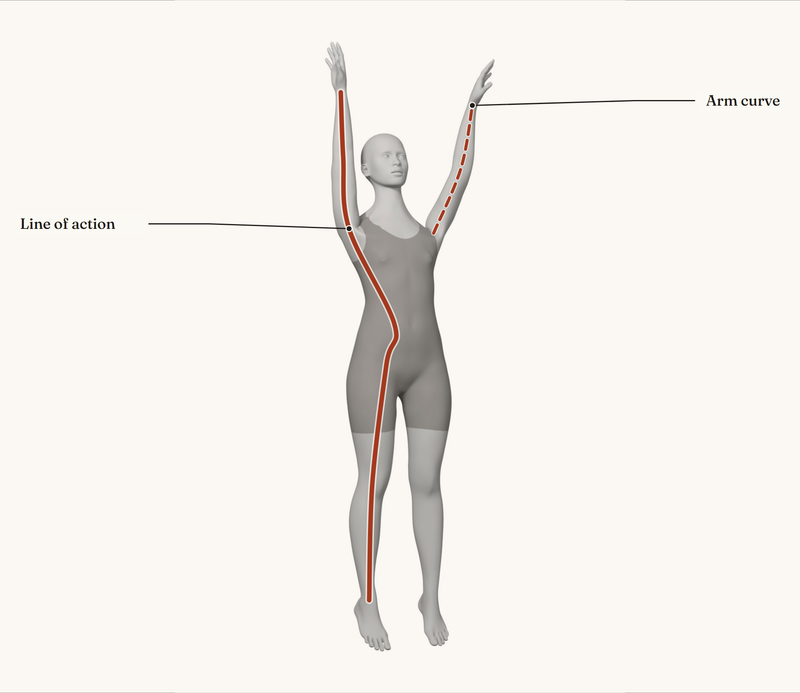
Reaching up
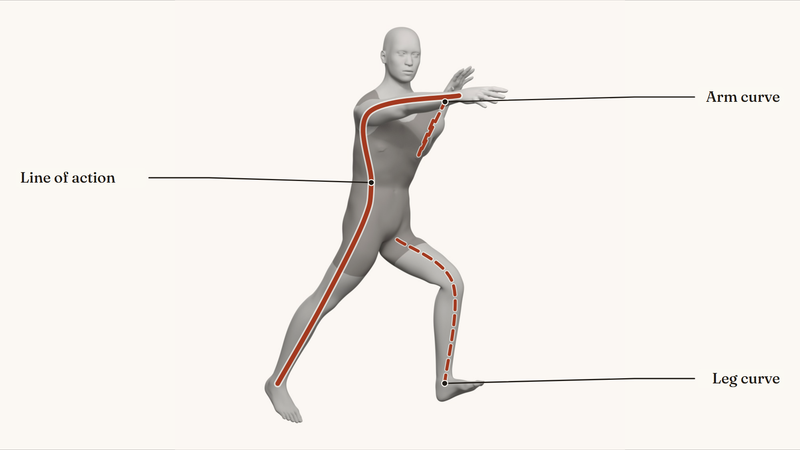
Action: lunging punch
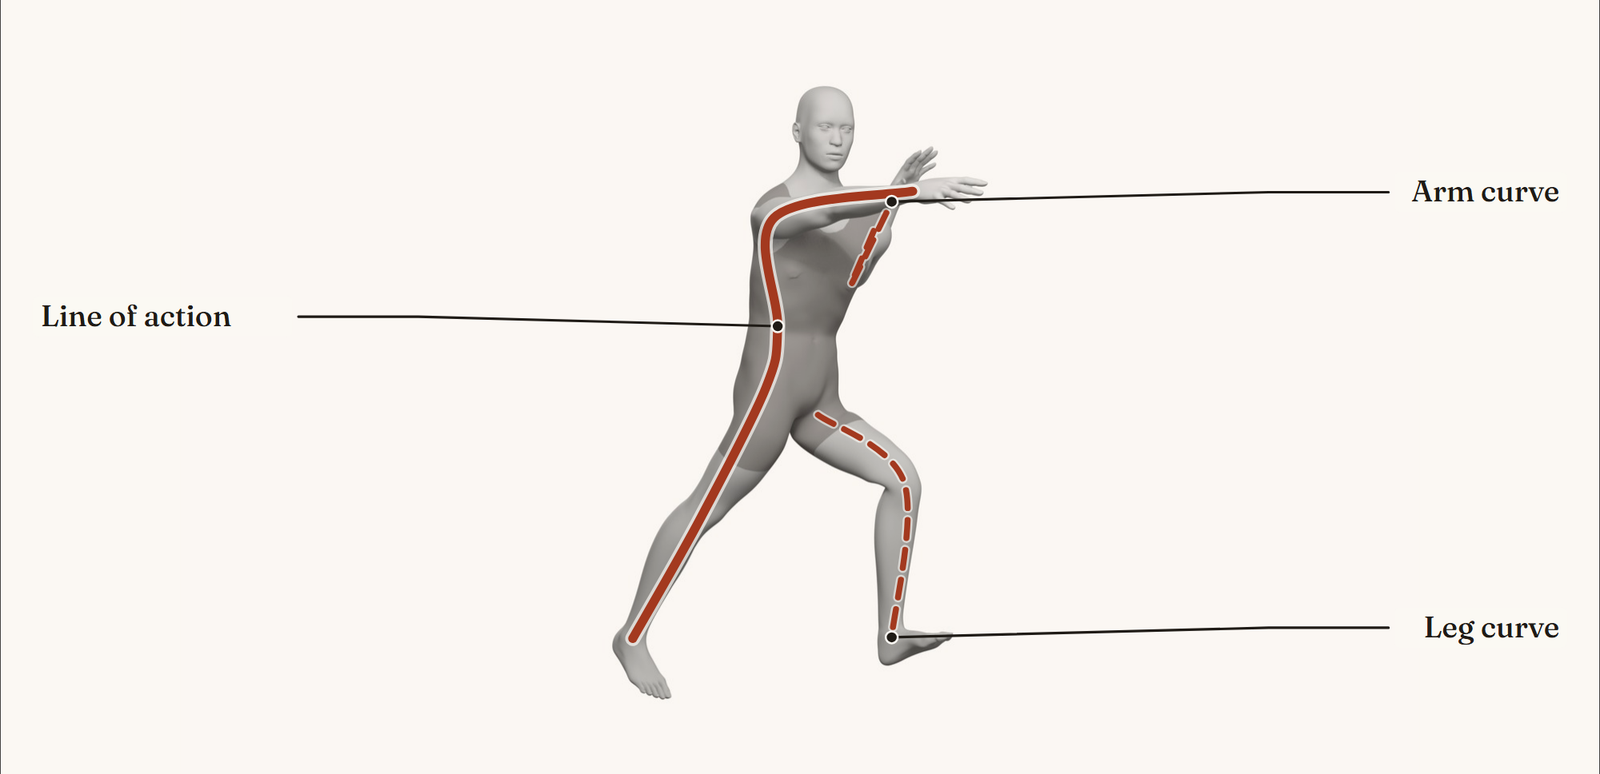
Reaching and action poses. In a stretch or a punch, the line of action often starts at the hand, not the head, and runs through the shoulder and torso down to the foot that pushes against the ground. Exaggerate that line slightly and the pose gains energy.
For hundreds of pose ideas by type, see our planned list of drawing poses.
Figure drawing reference: six poses without overlays
Practice on clean reference first, then compare with the overlays above. These are the same 3D figures without any lines on them.
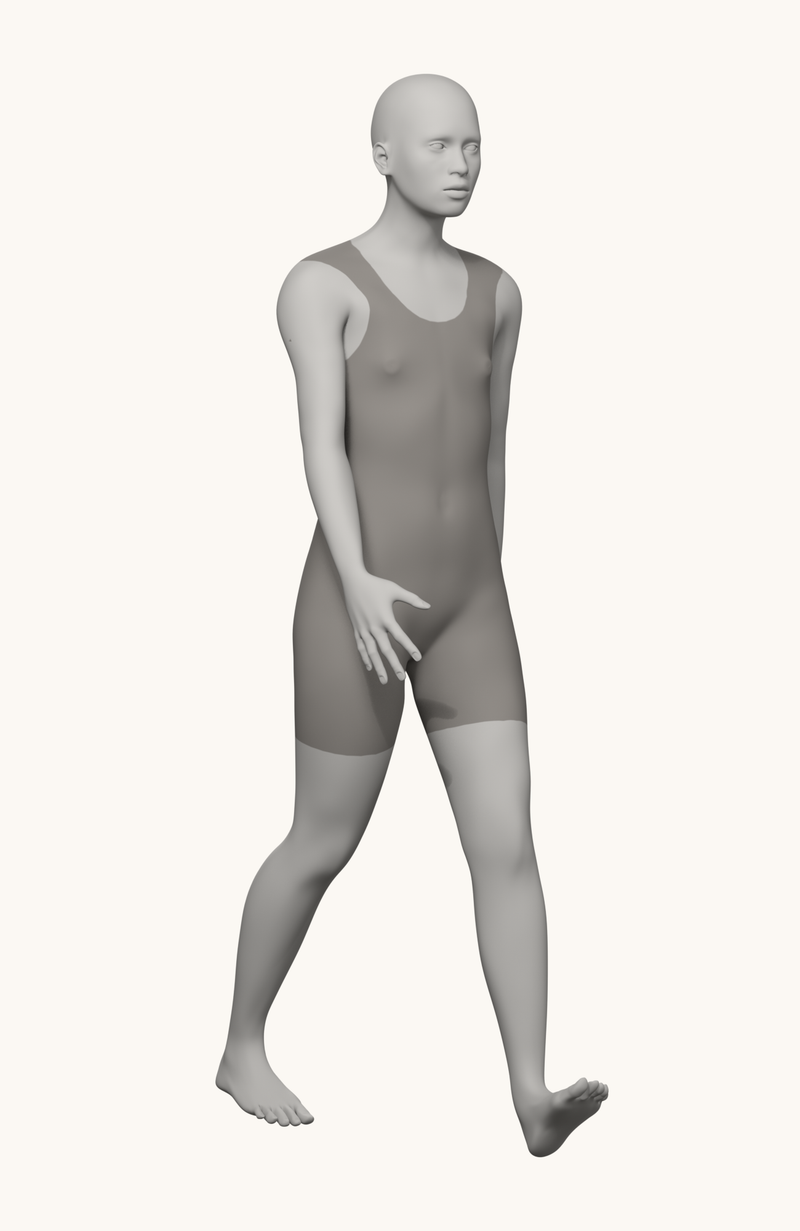
Walking
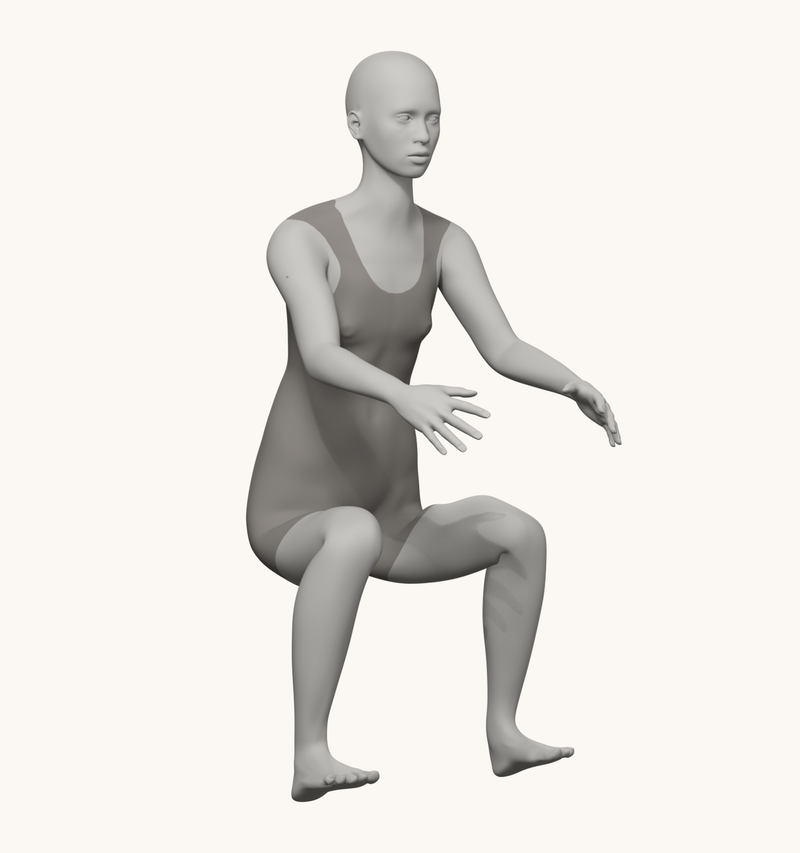
Crouching
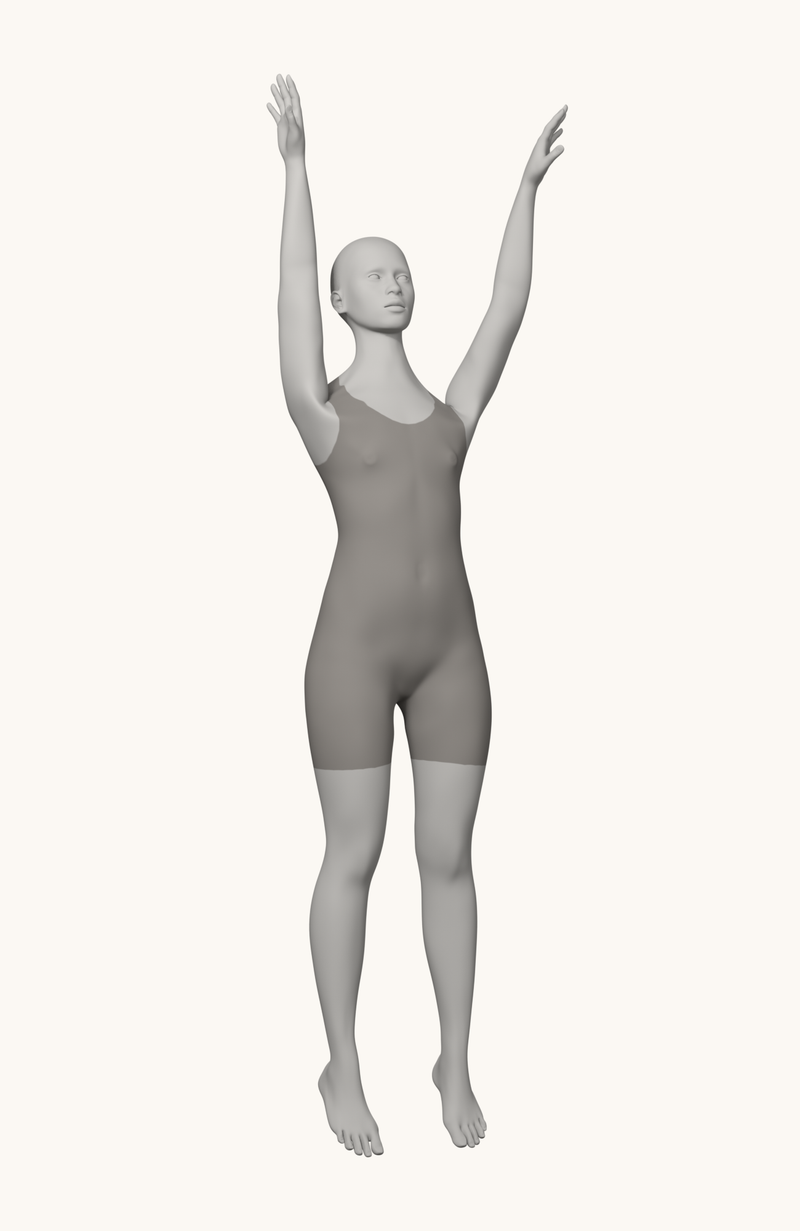
Reaching up
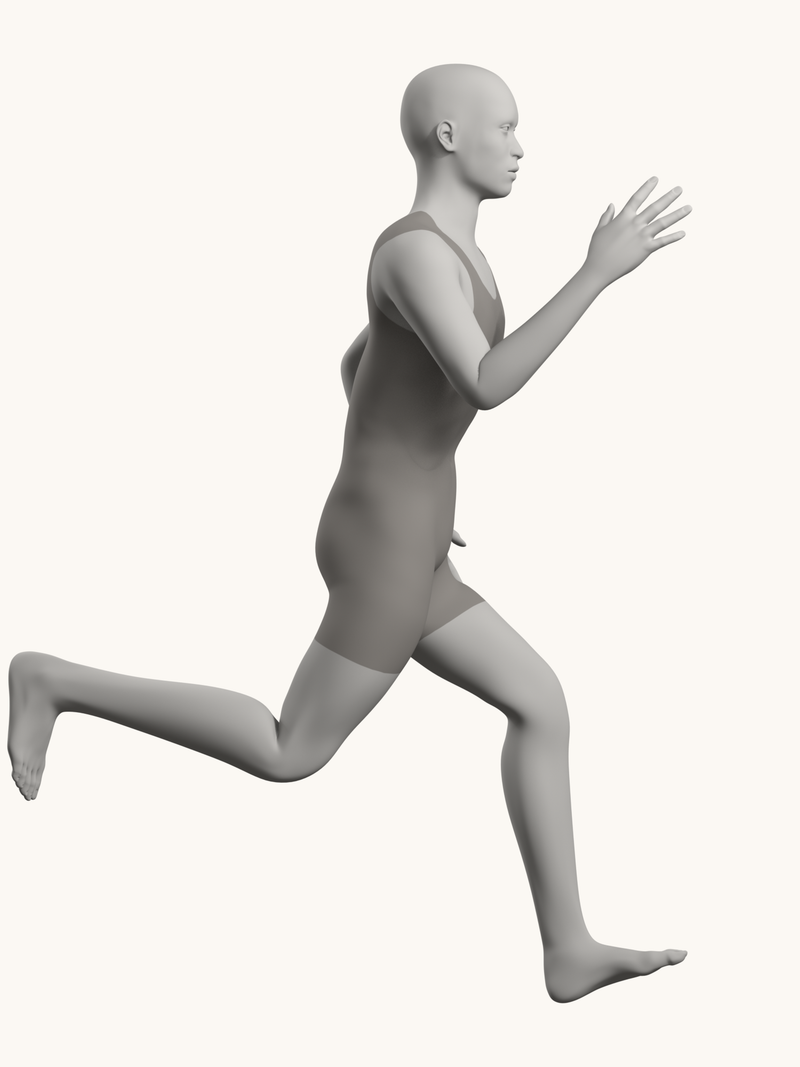
Running
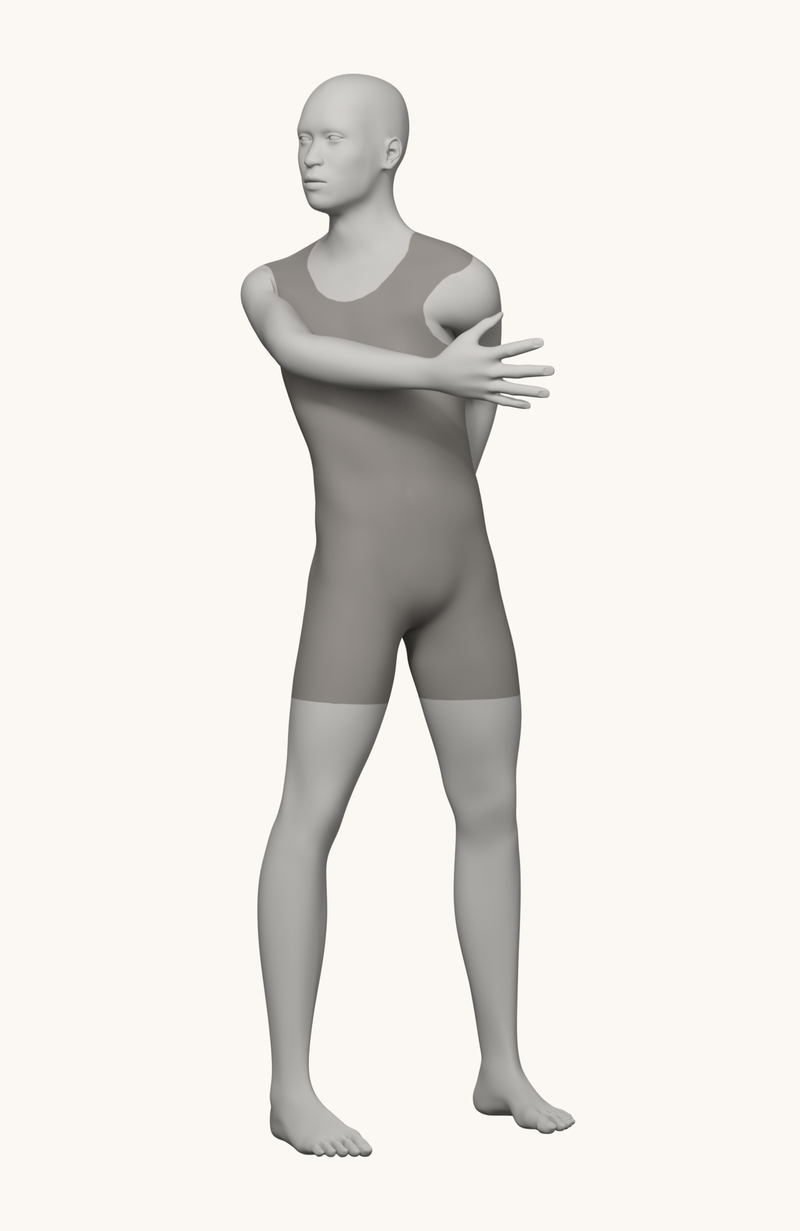
Twisting
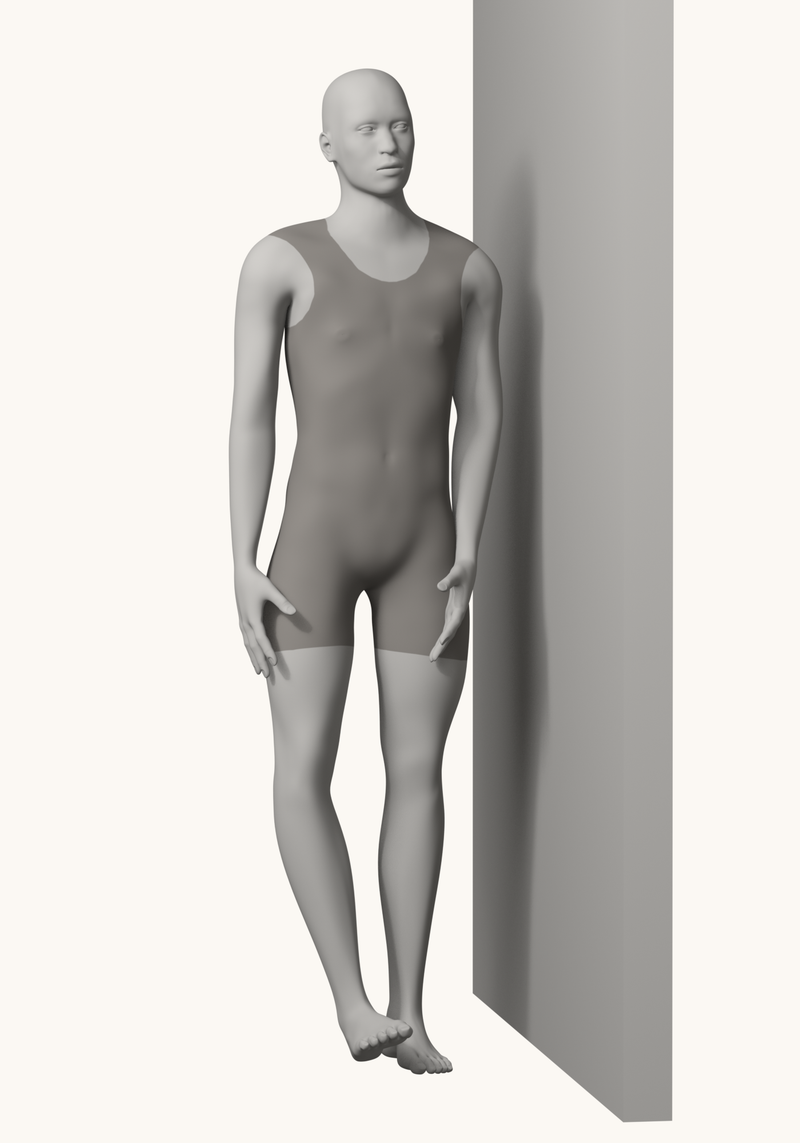
Leaning
The sheet below reduces twelve poses, including these, to their line of action, head and limbs. It is traced from the joints of our 3D figures, so every pose is one a body can actually hold. Copy each in under 30 seconds as a warm-up.
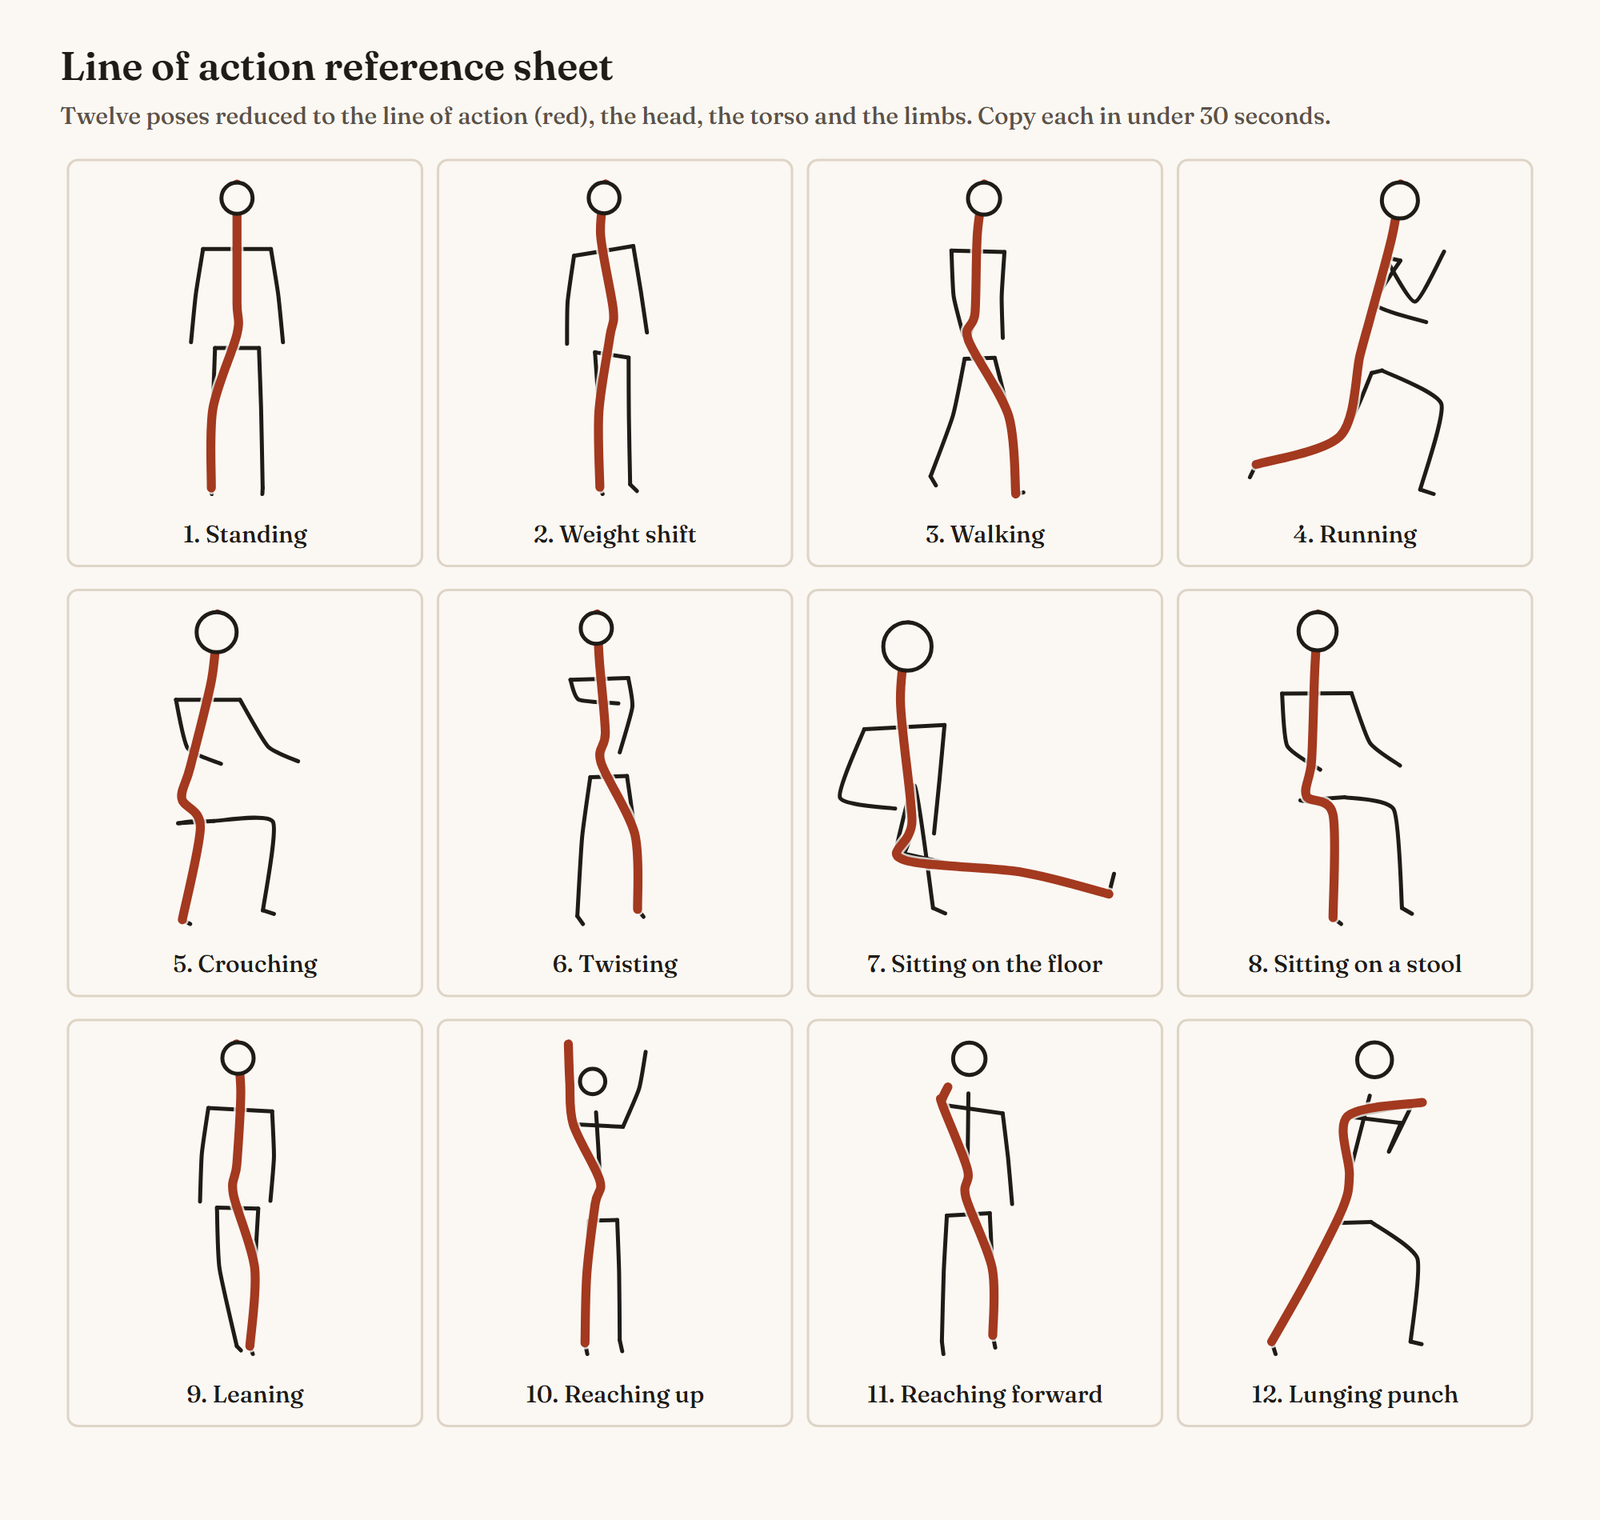
Figure drawing tips for beginners
Most early problems in figure drawing come from a few habits. These tips address them directly:
- Draw the whole figure every time. Even in a 5-minute pose, get the head, torso and all four limbs down before refining anything. A figure without feet can’t stand.
- Look more than you draw. Spend as much time looking at the reference as at your paper, especially in short poses.
- Find the tilts first. The angle of the shoulders, the angle of the hips and the direction of the head explain most poses.
- Think in overlapping forms. Where the arm passes in front of the torso, let the line of the arm cut across. Outlines that never overlap look flat.
- Keep the line of action curved. If a figure looks stiff, exaggerate the curve of the line of action and redraw it.
- Simplify before you detail. Hands become mittens, feet become wedges, the head becomes an egg, until the pose is right.
- Draw from memory regularly. Redrawing a pose without reference shows you what you actually learned.
- Change your reference. Alternate between female and male figures, different body types and different angles so you don’t learn one body by heart.
If you are a beginner drawer and figure drawing is your first big drawing subject, the same habits apply to everything else you draw. Learning to see the whole before the parts is the core skill of drawing, and figures are one of the best subjects to learn it on.
Figure drawing for character and concept art
Character figure drawing uses the same skills with a different goal: instead of recording a pose, you invent one that tells the viewer who the character is and what they are doing. That is why concept artists practice gesture so much. A clear line of action and a readable silhouette matter more in a character pose than accurate detail.
A few habits help when you start drawing concept art poses from imagination:
- Start from a verb. “Bracing against the wind” gives you a line of action; “standing” does not.
- Thumbnail first. Draw several tiny gesture figures and pick the clearest before you build the forms.
- Check the silhouette. Fill the figure in black. If the pose still reads, it works.
- Use reference for the hard parts. Pose a 3D figure or take a photo of yourself for the hands and feet.
Our pillar on the basics of character design covers silhouettes, shape language and the rest of the design process.
Where to go next
Figure drawing improves with mileage, so the next step is a routine you can keep. If you are choosing what to study next, these guides build directly on this one: the anatomy drawing guide for the anatomy layer, the best gesture drawing sites for timed reference, and our planned roundup of figure drawing courses if you want a structured program. Common errors are collected in our planned guide to figure drawing mistakes.
Common mistakes
- Starting with the outline or the face.
- Fix: Start with the line of action and the big masses. Contours and features come last, once the pose stands.
- Drawing every pose stiff and symmetrical.
- Fix: Find the tilt of the shoulders and the hips first; they almost always tilt in opposite directions.
- Floating feet.
- Fix: Draw a ground line and check that the weight sits over the supporting foot or between both feet.
- Only doing long, careful drawings.
- Fix: Mix short timed poses into every session. They train you to see the whole figure before the details.
- Copying photos line by line.
- Fix: Use photos for information, not tracing. Build the figure from gesture and forms, then check it against the photo.
- Skipping review.
- Fix: End each session by comparing your drawings with the reference and noting the one thing to fix next time.
Practice exercise
The eight-pose gesture drill
- Set the timer to 1 minute. Draw each of the eight poses as a line of action, a head, and the shoulder and hip lines.
- Draw all eight again at 1 minute each, this time adding a rib-cage egg and a pelvis box.
- Pick the two poses that felt hardest and give each 2 minutes, adding the limbs as simple cylinders.
- Compare your drawings with the line-of-action overlays on this page and circle where your line went stiff.
Frequently asked questions
What is figure drawing?
Figure drawing is drawing the whole human body, usually from a model, a photo or a 3D figure. The goal is a believable pose with weight, proportion and movement, not a portrait or a finished illustration.
How do I start figure drawing as a beginner?
Start with gesture: draw the line of action of a pose in under a minute. Then learn proportions in head heights and the simple mannequin of head, rib cage and pelvis. Add anatomy only after you can draw a figure that stands and moves.
How long should figure drawing poses be?
Most sessions mix short and long poses: 30 seconds to 2 minutes for gesture, around 5 minutes for forms, and 10 to 25 minutes for a longer study. Those times are common practice, not a rule; what matters is that short poses come first.
Is it better to draw from life or from photos?
Both help. Life drawing shows you form and depth that a photo flattens, while photos and 3D models let you practice any day and pause on difficult poses. Use photos for information and draw from life when you can.
What is a figure study?
A figure study is a practice drawing of the body made to learn something specific, such as how the torso twists or how the weight shifts, rather than to make a finished picture.
Sources
- Constructive Anatomy (George B. Bridgman, c1920), item record, Internet Archive. Accessed .