How to Become an Artist: A Practical Guide
Part of Learn to Draw & Artist Life
Quick answer
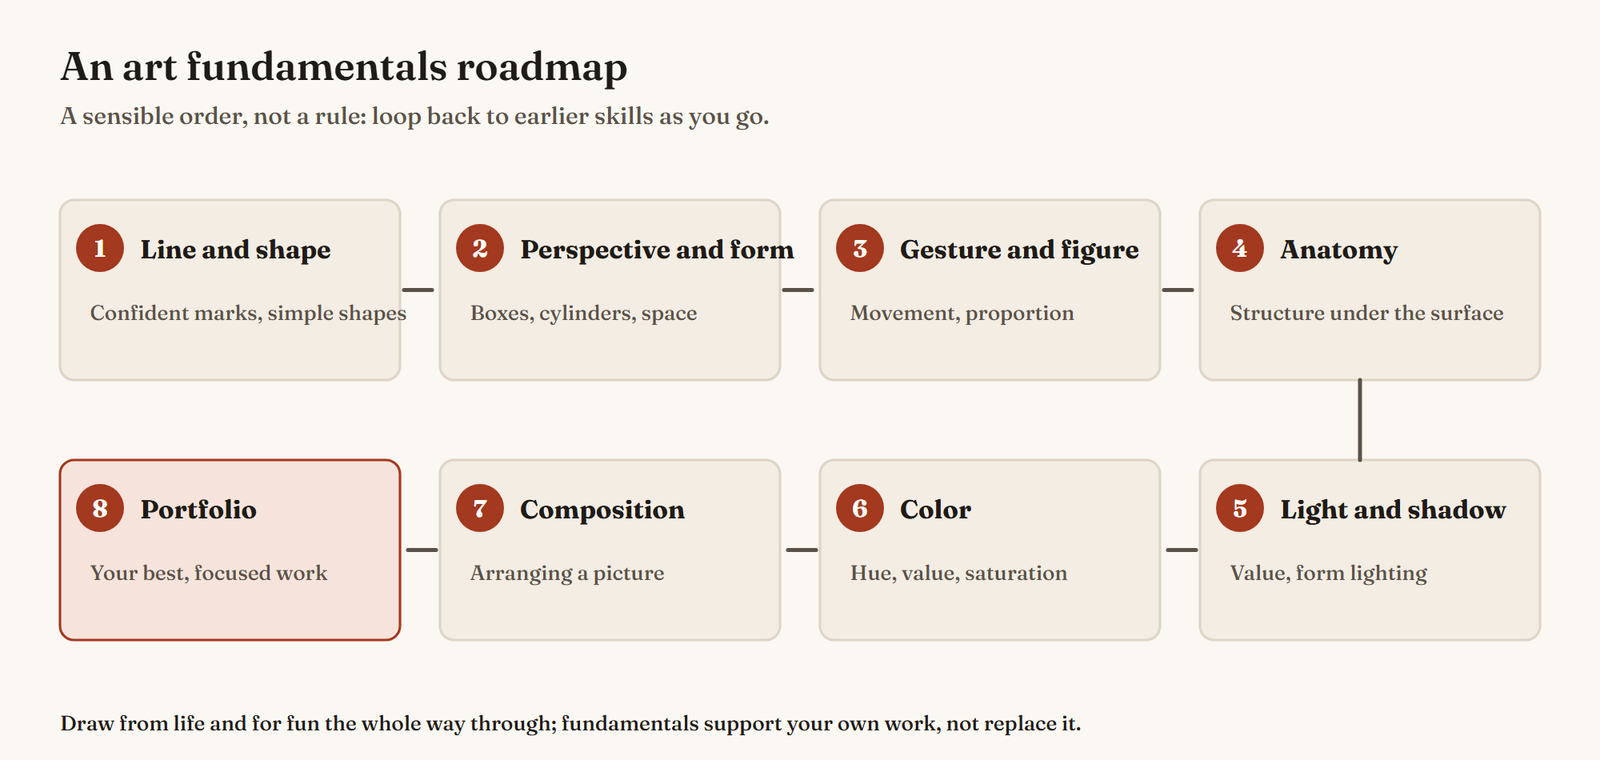
Becoming an artist comes down to three things: learning the fundamentals (line, perspective and form, the figure, light and shadow, color and composition), practicing a little every day, and making work of your own that you share. Art school, self-study and online courses can all work; most artists combine them. When your fundamentals are solid, build a short, focused portfolio aimed at the kind of work you want.
Becoming an artist isn’t a single decision; it’s a long series of small ones. You choose how you’ll learn, what to study, how to practice, and eventually how to share your work. This guide walks through each step in order: what being an artist can mean, the paths people take, the fundamentals worth learning, how to build a habit, and how to put together a portfolio. It’s written for beginners, but it’s also a checklist if you want to know how to become a better artist after years of drawing on your own.
There are no shortcuts in what follows, but there’s a clear path. You can start today with a pencil and paper.
What does “becoming an artist” mean?
“Artist” covers a huge range of work. Some artists sell paintings or prints. Others work in studios: concept artists, illustrators, animators, character designers, storyboard artists, comic artists, graphic designers and many more. Others teach, make art for themselves alongside another career, or build an audience online.
Before you decide how to learn, it helps to decide what you want to make, at least roughly. You don’t need a final answer; most artists change direction more than once. But a direction tells you which skills to prioritize. If you’re curious about studio work, our guide to what a concept artist does explains one popular path in detail.
Is becoming an artist hard?
It takes time, and it’s competitive if you want to do it professionally. But the skills themselves are learnable. Drawing isn’t a gift some people have and others lack; it’s a set of skills (seeing shapes, judging proportions, understanding form and light) that improve with practice. The hard part isn’t talent; it’s consistency.
Types of art careers
A few broad families of art work, each with its own mix of skills:
- Entertainment art: concept art, character and environment design, storyboards, animation and visual development for games, film and TV. Strong fundamentals and design thinking matter most.
- Illustration: books, editorial work, packaging, posters and advertising. Style, storytelling and reliability with clients matter a lot.
- Comics and graphic novels: drawing, writing and visual storytelling across many pages.
- Design: graphic design, UI and branding lean more on layout, typography and communication than on drawing.
- Fine art: paintings, prints and other work sold directly, through galleries or at markets.
- Teaching and content: classes, workshops, courses and online channels.
Pay and stability vary enormously between these fields, between countries and between individuals, so look up current, local data for any path you’re seriously considering rather than relying on general averages.
Three paths: art school, self-taught or online courses
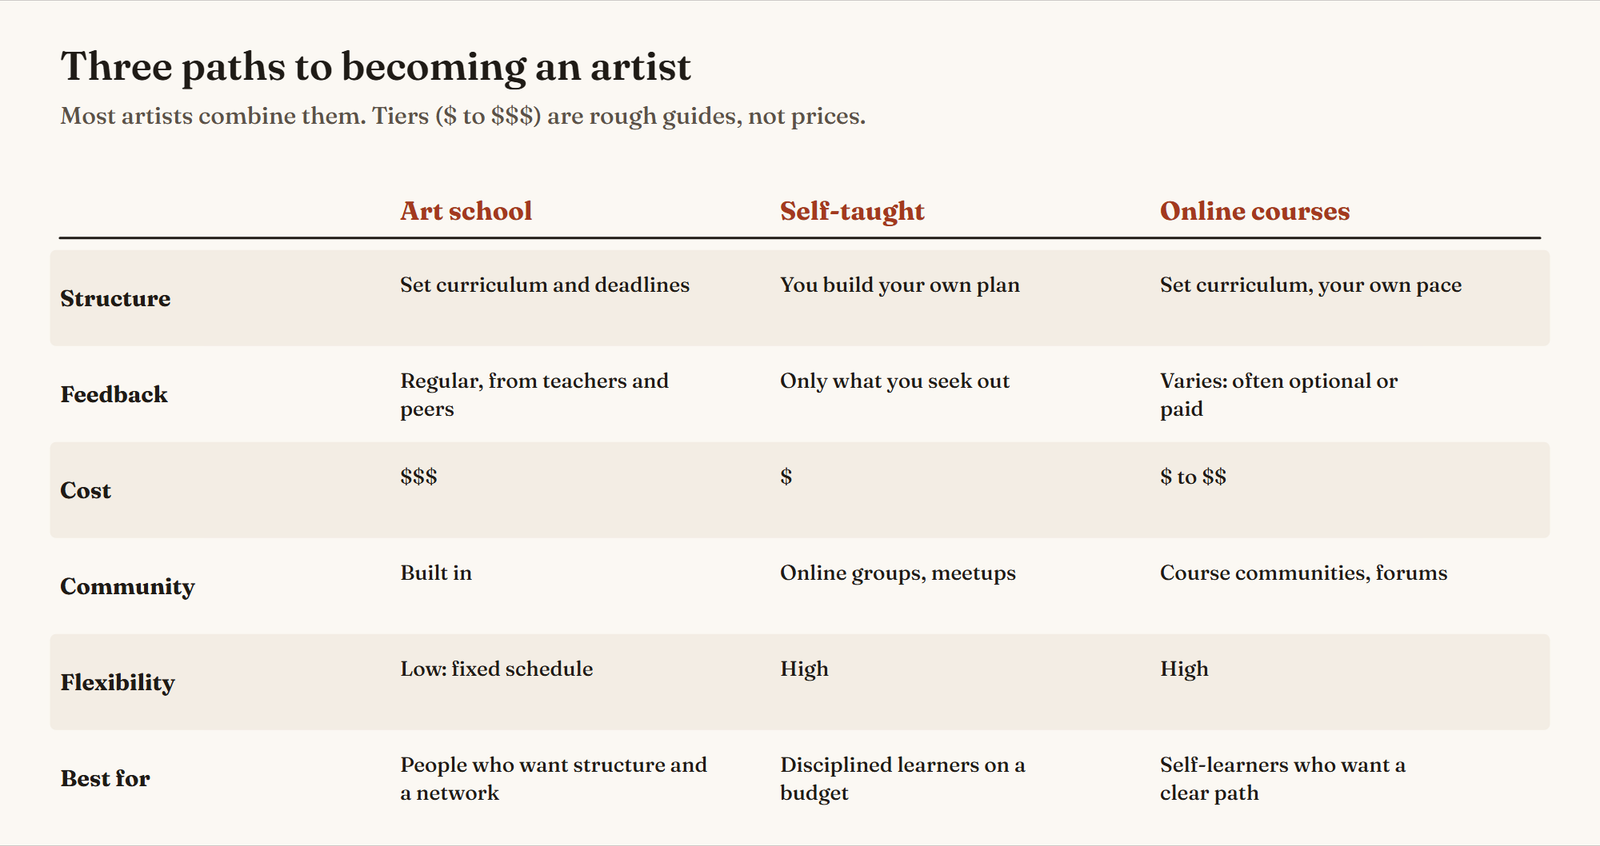
Art school gives you structure, deadlines, regular feedback from teachers and peers, and a network that can matter later. It’s also the most expensive and the least flexible option.
Teaching yourself is the cheapest and most flexible path, and plenty of working artists learned this way. The challenge is feedback and direction: without a teacher, you have to find out what you’re doing wrong and what to study next.
Online courses sit in between: a structured curriculum at your own pace, often with an optional community or paid critique. Free courses such as Drawabox (see our Drawabox review) and paid platforms both exist, and YouTube is full of excellent teachers; our list of the best art channels on YouTube sorts them by topic.
Most artists combine all three over time: a course for structure, self-study for depth, and feedback wherever they can find it.
Learning art by yourself
If you’re teaching yourself, three things replace what a school would give you:
- A plan. Follow a sequence of fundamentals (see the roadmap at the top of this page) instead of drawing whatever you feel like every day. Fun drawing still matters, but it shouldn’t be your only practice.
- Feedback. Post your work in communities, join a study group, take a class now and then, or pay for critique when you can. Compare your drawings with the reference honestly.
- A habit. Short, regular practice beats occasional marathons. Our guide to drawing every day shows how to build a habit you can keep.
Learning from the pros
Professional artists share an enormous amount of knowledge: books, courses, videos, interviews and process breakdowns. Study how they think, not only what their work looks like. Copying a master drawing as a study (and labeling it as one) is a time-honored way to learn; just don’t present copies as your own designs.
What you need to start
Very little. A pencil or pen, cheap paper or a sketchbook, an eraser and a sharpener are enough for the first months; our guide to the drawing supplies you actually need keeps the list short. More important than tools:
- A regular time. The same 20 or 30 minutes each day, so drawing becomes automatic.
- A place. A corner of a table where your sketchbook can stay open.
- Reference. Objects around you, photos with clear lighting, and timed pose sites for figures.
- A way to keep your work. Sketchbooks or a folder, dated, so you can see progress.
Upgrade materials later, when you know what you enjoy and what holds you back.
The art fundamentals
The fundamentals are the shared skills behind almost every kind of art: line and shape, perspective and form, gesture and the figure, anatomy, light and shadow, color and composition. You can’t avoid them forever. You can make interesting work without them for a while, but eventually they’ll be what holds you back.
The good news: each one is a finite, learnable subject. The roadmap at the top of this page shows a sensible order. It isn’t a rule; you’ll loop back to earlier skills many times.
How to study the fundamentals
- One topic at a time. Spend a few weeks focused on one fundamental before moving on, while keeping a little time for everything else.
- Learn, then apply. After a study session, make a drawing of your own that uses what you just learned.
- Draw from life. Real objects, people and places teach you things no tutorial can.
- Repeat. Come back to earlier topics; you’ll understand them more deeply each time.
Gesture, figure drawing and anatomy
People are one of the most common subjects in art, and drawing them well depends on three linked skills. Gesture captures movement and the line of action in seconds. Figure drawing adds proportion and structure. Anatomy explains the forms under the surface.
Start with gesture: short timed poses of 30 seconds to two minutes, focused on movement, not detail. Our list of the best gesture drawing sites gives you free timed references. Then work through figure drawing with our step-by-step guide on how to learn figure drawing, and add anatomy with our guide to improving your anatomy drawing. If you prefer books, our roundup of the best figure drawing books covers every level.
Perspective
Perspective is the system that makes drawings feel like they exist in space. It looks technical, but the core ideas are simple: a horizon line at your eye level, vanishing points, and lines that converge toward them. Our drawing fundamentals section collects our guides to perspective, form and line.
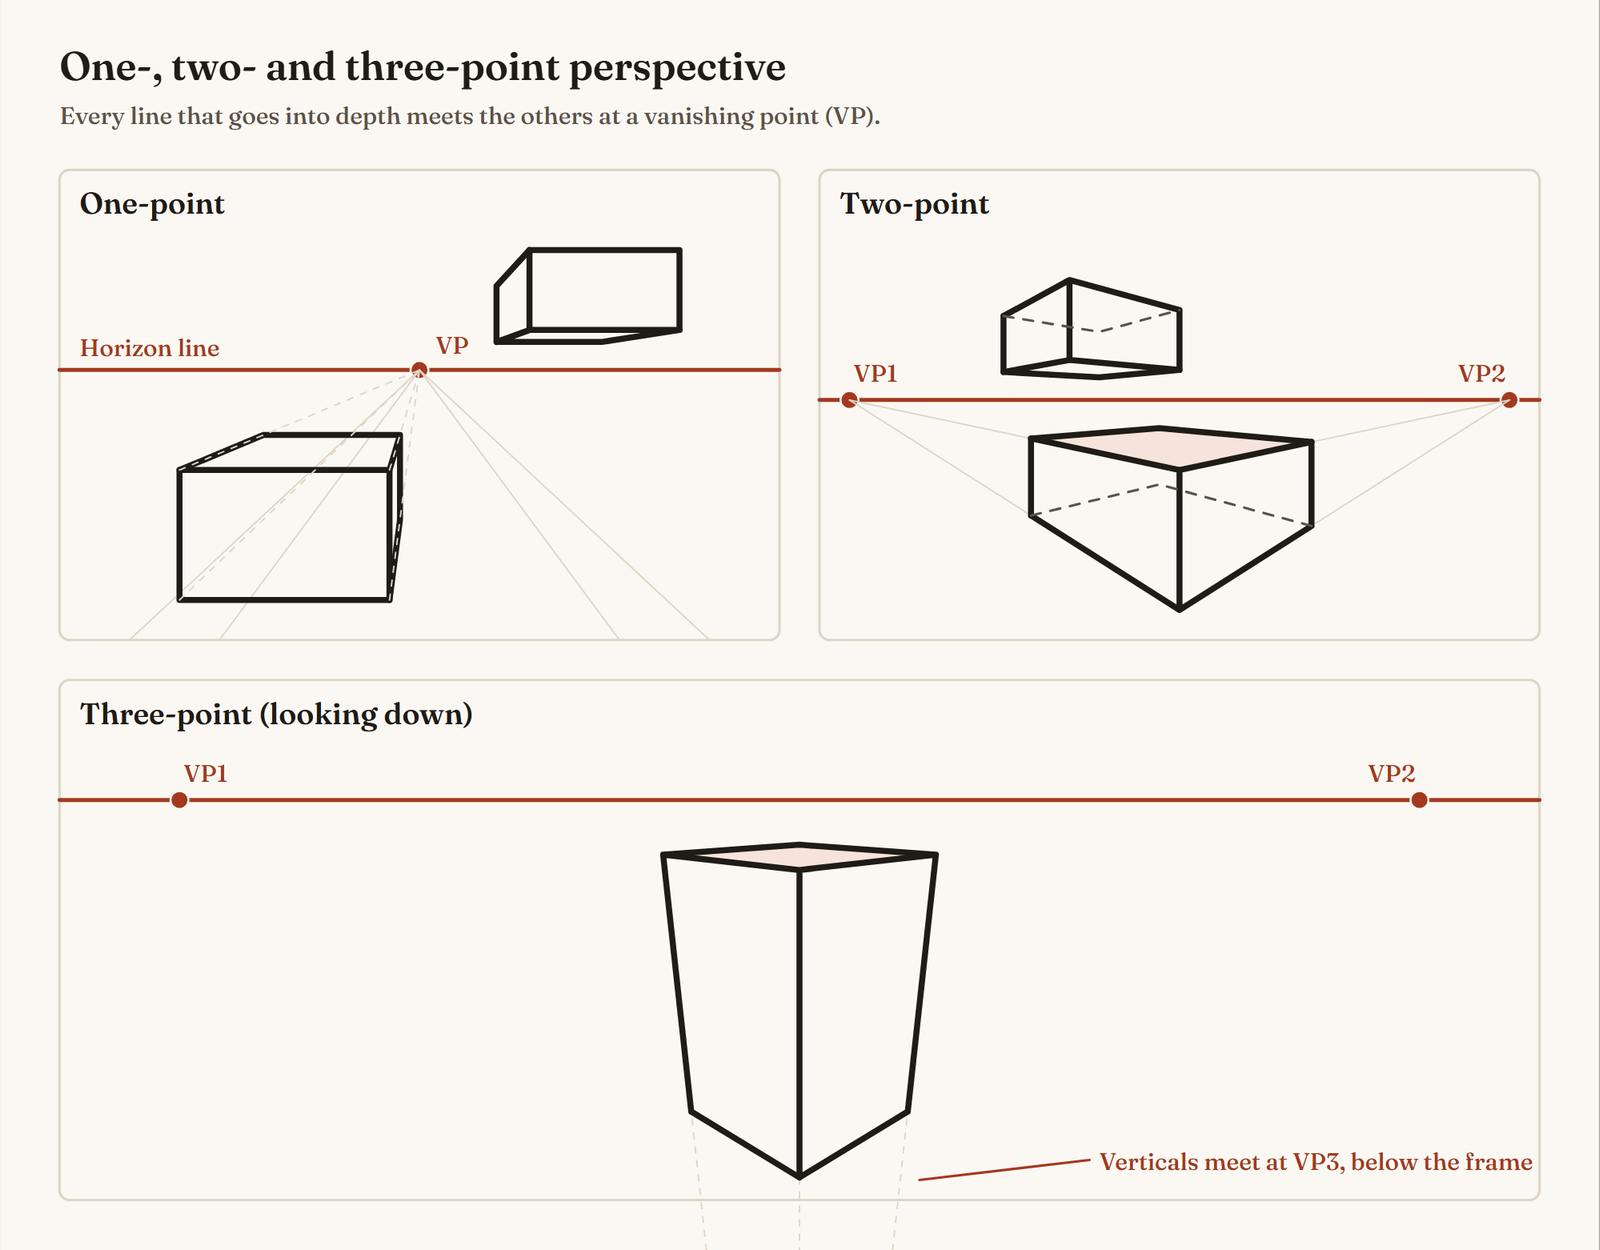
- One-point perspective: one vanishing point; good for roads, corridors and rooms seen straight on.
- Two-point perspective: two vanishing points; the standard for buildings and objects seen from a corner.
- Three-point perspective: a third vanishing point above or below; for tall buildings and dramatic angles.
You need perspective for any art with space in it: environments, comics, concept art, architecture, even figures in a room. Practice by drawing boxes in perspective, then rooms and streets from life. Our roundup of the best perspective drawing books and our planned guide to perspective drawing go further.
Form and structure
Form is the idea that everything you draw has volume. Where perspective is about space, form is about the objects in it: how a shape turns, where its surfaces face, how parts connect. Almost any object can be built from four primitives.
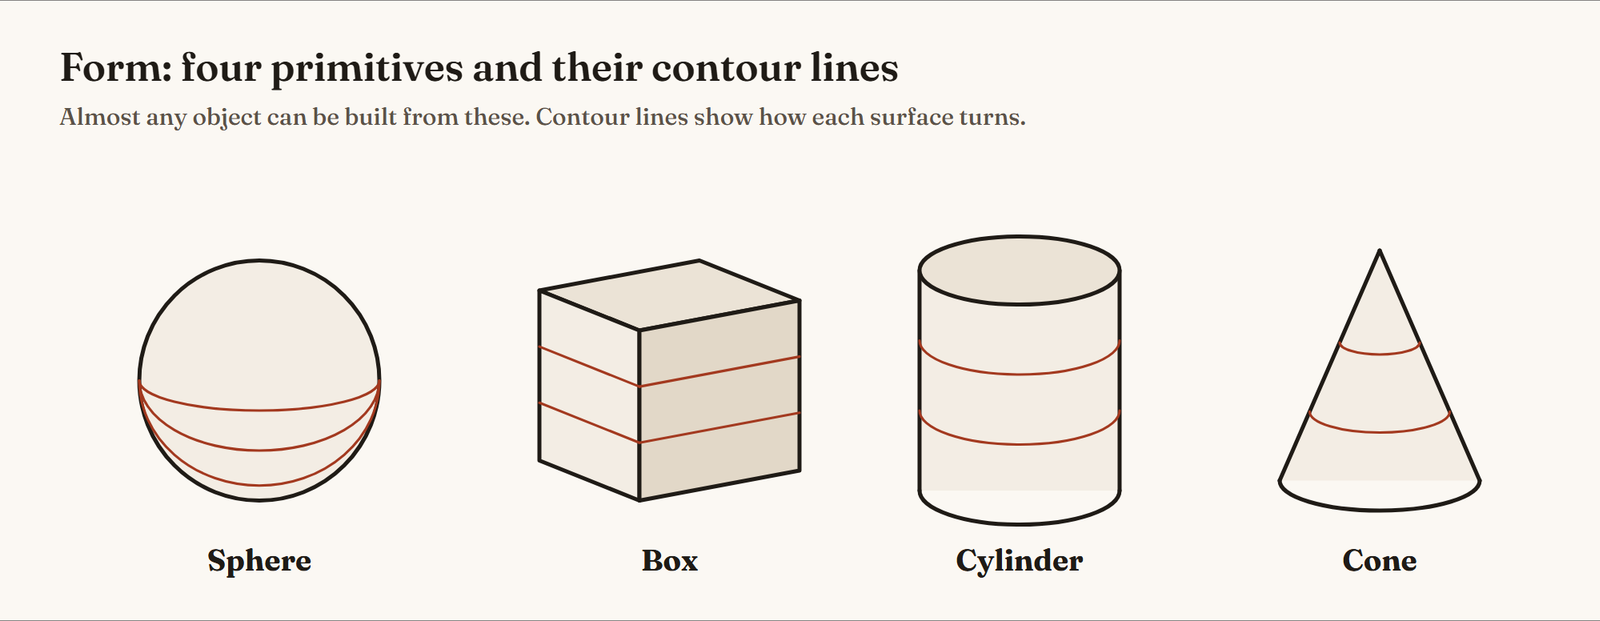
Contour lines that wrap around a form show how its surface turns. Drawing them, even lightly, trains you to think in three dimensions. Practice by building everyday objects from primitives: a mug is a cylinder, a phone is a box, a lamp is a cone on a cylinder. Then try combining and deforming forms, bending a cylinder or squashing a sphere, to see how far you can push them.
Light and shadow
Light and shadow make forms readable. Once you understand how light falls on a simple form, you can light anything convincingly.
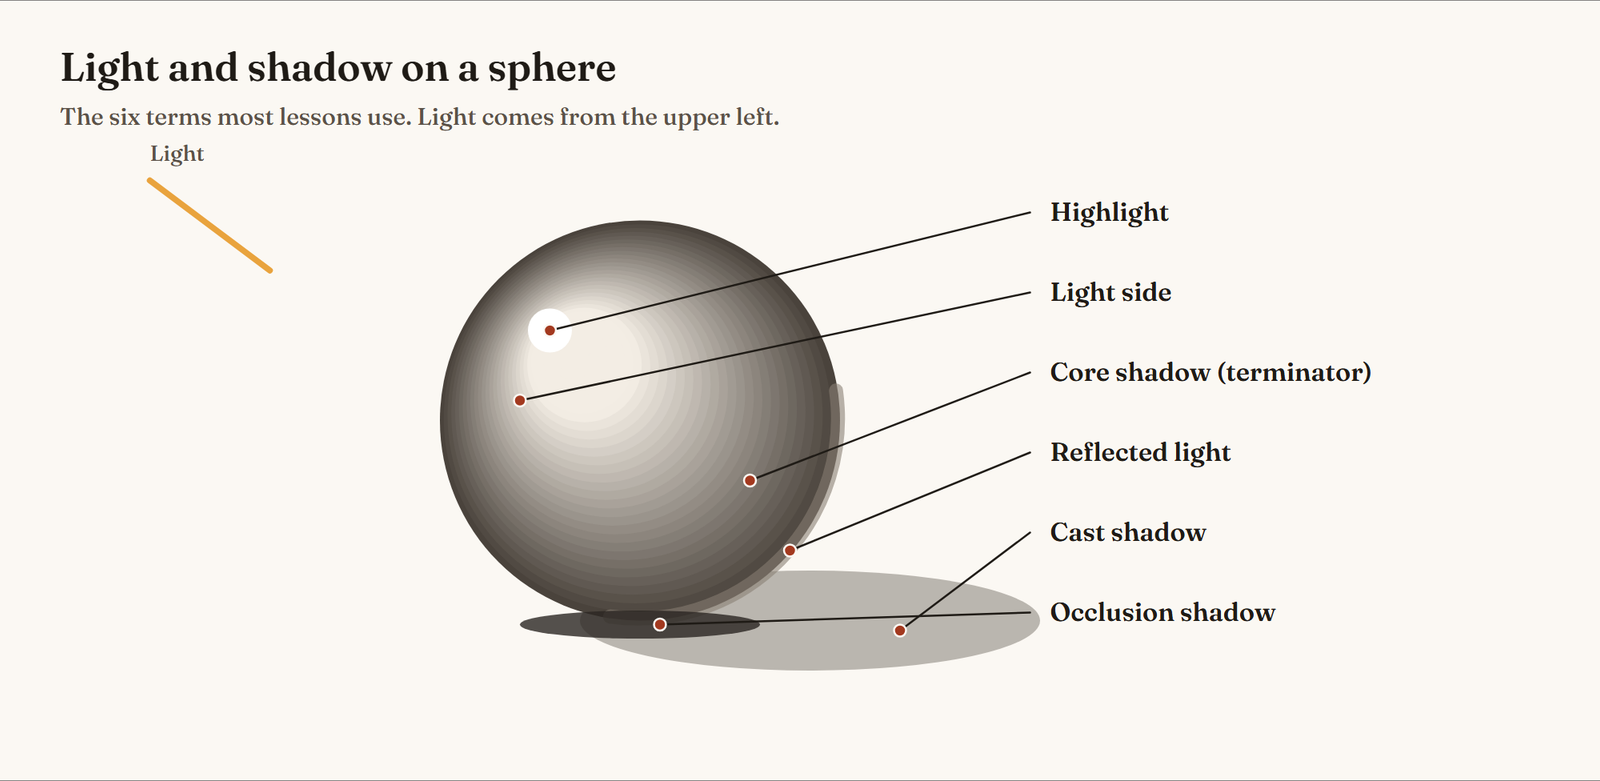
- Light side and shadow side: every lit form splits into the side facing the light and the side turned away.
- Core shadow (terminator): the darkest band on the form, where it turns away from the light.
- Reflected light: light bouncing back into the shadow side from nearby surfaces.
- Cast shadow and occlusion shadow: the shadow the form throws, darkest where it touches the ground.
Start with a single light source on simple objects, such as an egg or a mug under a desk lamp. Squint to see the big shapes of light and shadow before any detail. Our pencil grade chart in the guide to the best pencils for drawing shows how to build a value scale.
Color
Color theory can look intimidating, but three properties explain most of it.
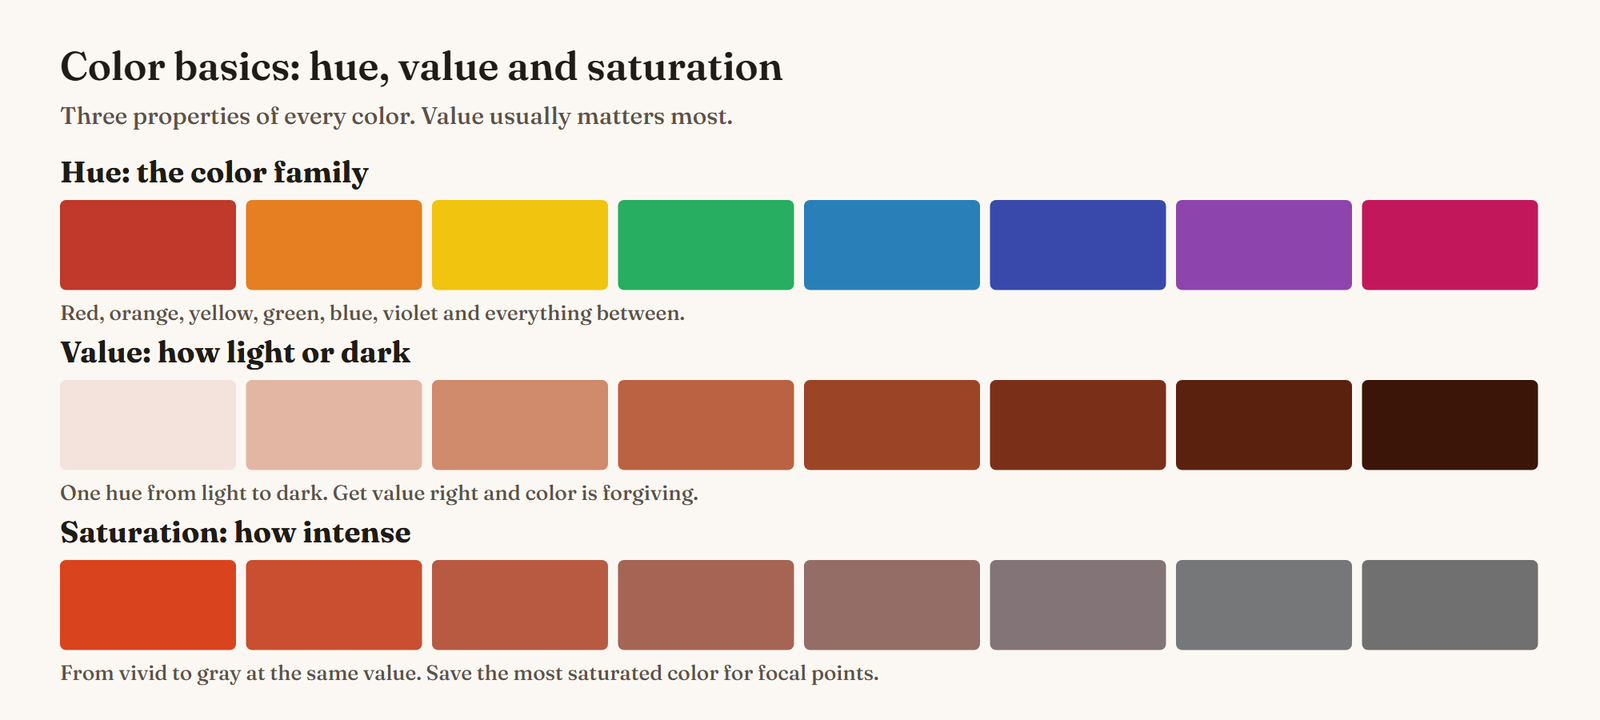
Hue is the color family, value is how light or dark it is, and saturation is how intense it is. Value usually matters most: a painting with the right values reads well even in odd colors, while beautiful colors with muddled values fall apart. Light also changes color: warm light usually means cooler shadows, and the reverse.
Practice color with small studies: paint the same simple scene at different times of day, or copy the colors of a photo in a few large patches. If you’re choosing a painting medium, our comparison of oil painting and watercolors explains how two of the most common ones differ.
Composition
Composition is how you arrange things in a picture so the viewer looks where you want, in the order you want.
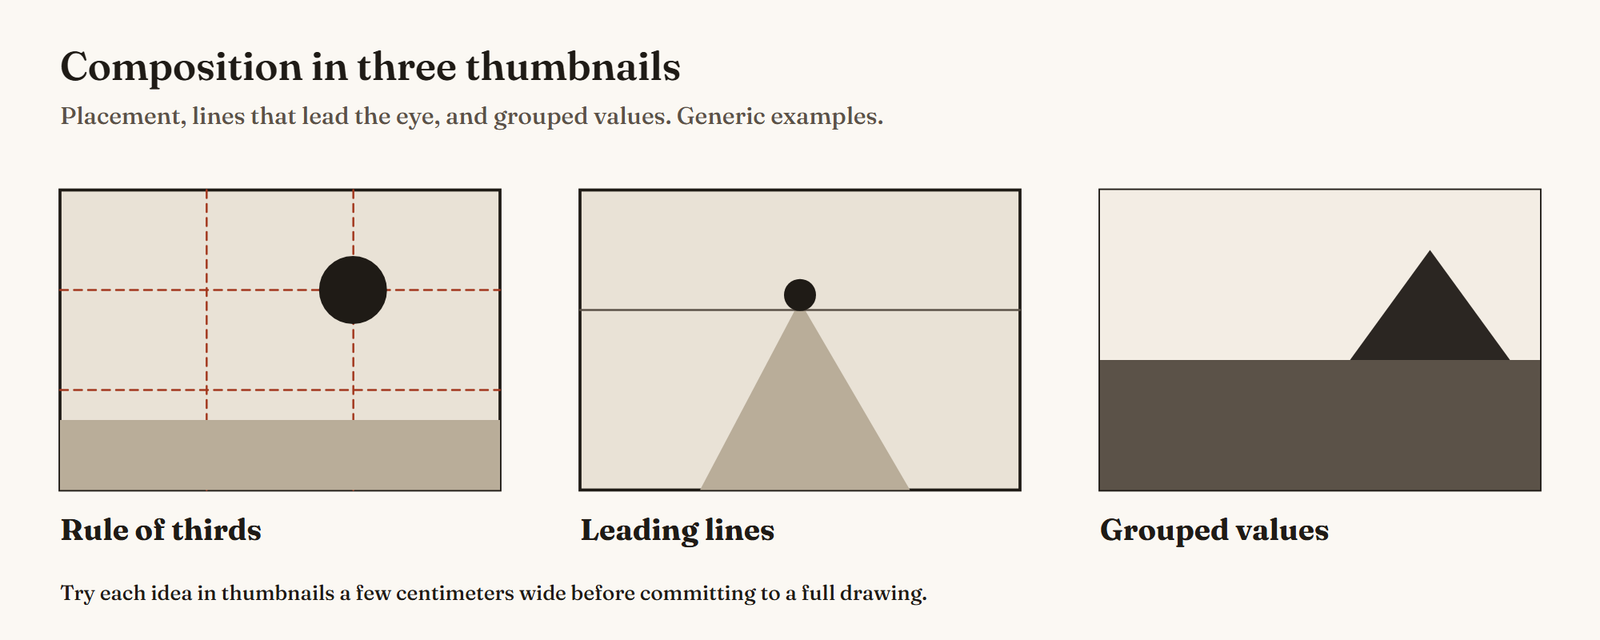
Three ideas take you a long way: place the focal point off-center (the rule of thirds is a simple guide), use lines in the scene to lead the eye toward it, and group the picture into a few large values instead of many small ones. Practice by making tiny thumbnails, a few centimeters wide, before every finished drawing. They’re fast, so you can try many layouts and pick the best.
Practicing deliberately
Not all practice is equal. Drawing the same thing you already draw well feels good but teaches little. Deliberate practice means picking a specific weakness, working on it with focus, and checking the result.
- Choose one target. “Hands that don’t look flat” is a target; “get better at drawing” isn’t.
- Use good reference. Photos with clear lighting, real objects, live models or 3D poses.
- Work in short, focused sets. Ten hand studies of three minutes each beat one hand drawn for half an hour.
- Compare honestly. Put your drawing next to the reference and find three specific differences.
- Fix one thing and repeat. Then move on to the next weakness.
Balance deliberate practice with drawing for fun. Fun keeps you going; deliberate practice makes you better. You need both.
Getting feedback
Feedback is the fastest way to see what you can’t see yourself. A few ways to get it:
- Communities and study groups. Online art communities and local drawing groups where people share work and critique each other.
- Classes and workshops. Even one short course gives you a teacher’s eye on your work.
- Paid critique. Some courses and mentors offer reviews of your work; it’s often worth it at key moments, like before building a portfolio.
- Self-critique. Flip your drawing horizontally, view it small, or come back to it the next day. Fresh eyes catch mistakes.
When you get feedback, listen for patterns. If three people mention the same problem, that’s your next study topic.
Staying motivated
Every artist hits plateaus, stretches where progress feels invisible. They’re normal, and they usually come right before a jump in skill. A few things help:
- Track your work. Date your drawings and keep your sketchbooks, so you can see progress over months.
- Make things you care about. Fan art, comics, characters, portraits of friends: personal projects keep the joy in drawing.
- Lower the bar on bad days. Two minutes of doodling still counts and keeps the habit alive.
- Find your people. Drawing with others, online or in person, makes the long road feel shorter.
Traditional or digital?
You can become an artist with either. Traditional tools (pencil, pen, paint) are cheap to start and teach control and decision-making. Digital tools make editing, color experiments and professional delivery easier, and most studio work today is digital. Many artists learn the fundamentals traditionally and add digital later, or use both. The fundamentals are the same either way.
Building a drawing habit
Every step above depends on practice. Short, daily sessions build skill faster and more reliably than rare marathons, because you keep what you learned yesterday fresh. Twenty or thirty minutes a day, every day, is a strong habit.
The keys are simple: draw at the same time each day, start small enough that you can’t fail, track your days, and keep a sketchbook for drawing just for fun. Our guides to drawing every day and sketchbooking cover both in detail. You don’t need expensive supplies to start; our guide to the drawing supplies you actually need keeps the list short.
Common questions about learning art
Is learning art this complicated? It looks like a lot written down, but you only ever work on one or two things at a time. Each fundamental is a few weeks of focused study, revisited over the years.
How long will it take? There’s no fixed timeline. It depends on how much you practice, how deliberately, and what kind of art you want to make. Daily practice usually shows clear progress within months; professional-level skill typically takes years.
What comes after the fundamentals? Specialization. Choose the kind of work you want to make (characters, environments, illustration, comics, fine art) and apply the fundamentals to it in your own projects. Our guide to the basics of character design is one example of where the fundamentals lead.
Building your portfolio
A portfolio is a small selection of your best work, chosen for a specific goal: a job, a school application, commissions or clients.
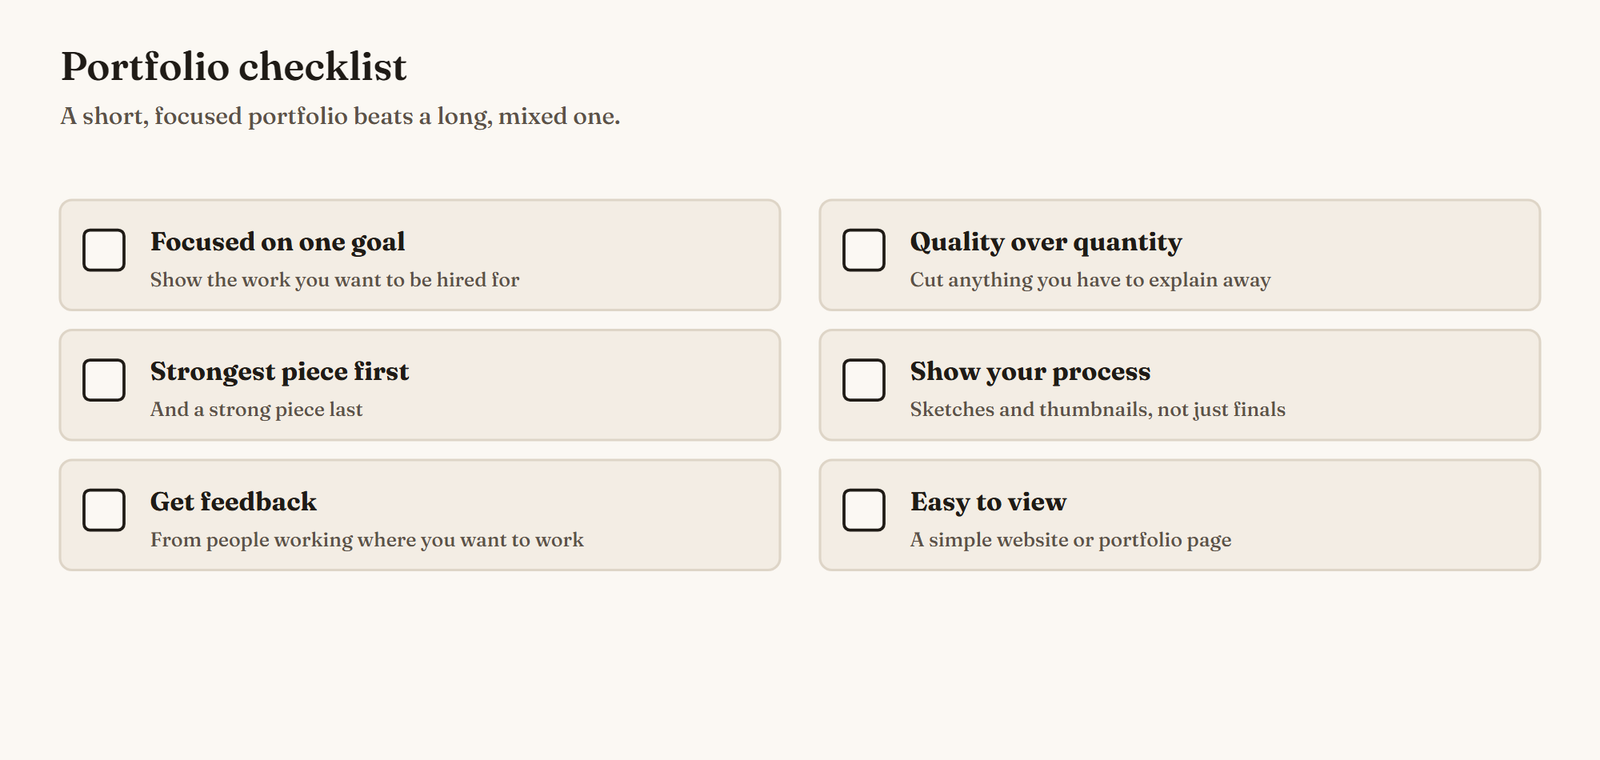
- Be focused. Show the work you want to be hired for. A character designer’s portfolio should be full of characters.
- Quality over quantity. If you have to explain a piece away, cut it. Your portfolio is judged by its weakest work.
- Show your process. Sketches, thumbnails and iterations show how you think, which matters a lot for studio work.
- Get feedback. Ask people who work where you want to work, not only friends and family.
- Make it easy to view. A simple portfolio website or page that loads quickly and puts your best piece first.
Going pro
Turning art into income takes skills beyond drawing:
- Promoting your work. Share it consistently where your audience and potential clients look.
- Building connections. Many opportunities come through people: classmates, online communities, events, other artists.
- Dealing with rejection. Every artist gets rejected, often. Treat each “no” as feedback on the work or the fit, not on your worth.
- The business side. Contracts, pricing, invoices, deadlines and taxes are part of the job. Learn the basics early, and get advice from people who do it.
- Social media. Useful for visibility, but don’t let it set your goals. Post work you’re proud of, not work chosen only to please an algorithm.
Now you’re ready to start
You don’t need to finish this guide’s whole roadmap before you call yourself an artist. Pick up a pencil today, draw something simple from life, and decide on one fundamental to study this week. Then do it again tomorrow. That’s how becoming an artist actually happens: one small, consistent step at a time.
A simple first week, if you want one: on day one, draw five objects on your desk from life. On day two, draw ten boxes in two-point perspective. On day three, do twenty 30-second gesture drawings. On day four, light an egg with a desk lamp and draw its shadows. On day five, make three composition thumbnails of your room. On the weekend, draw whatever you like, just for fun. Then repeat, a little more carefully each week.
Common mistakes
- Waiting for motivation or the right supplies before starting.
- Fix: Start today with a pencil and printer paper. Habits matter more than tools.
- Studying fundamentals only, with no drawing for fun.
- Fix: Split your time: study some days, draw what you love on others.
- Comparing your first year with someone else's tenth.
- Fix: Compare your work with your own drawings from three months ago.
- A portfolio with every piece you've ever made.
- Fix: Show only your best, focused on the work you want to do.
Frequently asked questions
Can you become an artist without art school?
Yes. Many working artists are largely self-taught or learned through online courses and books. Art school offers structure, feedback and a network; self-study offers flexibility and lower cost. What matters most is the quality of your work and how consistently you practice.
How long does it take to become a good artist?
There's no fixed timeline; it depends on how much you practice, what you practice and the kind of art you want to make. Expect years of steady practice to become professional-level, and noticeable improvement within months of daily drawing.
Is it too late to start learning art?
No. Drawing is a learnable skill at any age. Adults often progress quickly because they can practice deliberately and study fundamentals on purpose.
What should I learn first?
Start with line and simple shapes, then perspective and form. They make everything else, from figures to environments, easier to draw.